|
|||||||
| Home | Forum | Online Store | Information | LJ Webcam | Gallery | Register | FAQ | Members List | Calendar | Search | Today's Posts | Mark Forums Read |
 |
|
|
Thread Tools | Display Modes |
 12-07-2009, 04:39 PM
|
#1 |
|
Olivenhain Bob

Join Date: May 2008
Location: Olivenhain, CA
Posts: 1,124
|
Share Your Innovations
Anyway, as I was tinkering with my new Hobie Livewell I thought it might be fun to ask everyone to share some of the cool ideas and mods that they have come up with over the years. I remember reading of a few great innovations in this forum. A couple that come to mind are: Adding a weight to the bottom of the Hobie peddles so they remain upright all the time. A video camera mounted on a short mast attached to a stern mounted bait tank to record the day's events. I am sure our community has come up with dozens of simple but wonderful ideas that help make the kayak fishing experience better and more fun. If you have one of those ideas, post it in this thread and share it with the rest of us. I'll go first. We all know that we should leash our gear when out on the water. Sometimes, however, there is just no good place to clip a leash to a rod. With this problem in mind, I came up with an easy-to-make connection loop that can be installed on just about any kind of gear we carry on our kayaks. The thing takes a couple minutes to make and the materials cost less than a quarter. Behold the LEASH LOOP! All you need to make one of these is a four inch piece of coated wire leader, a similar size piece of shock cord, a crimp sleeve and a crimper. Materials-Needed.jpg Cut a 4" piece of the leader. Tie the shock cord so that you have a suitable size band that will stretch to fit around your rod, (or whatever else you want to use this thing for). Make sure that when the shock cord contracts, it fits tightly around your rod. After trimming the shock cord be sure to burn the end so the nylon does not fray. Tied-Shock-Cord.jpg Thread the leader through the crimping sleeve, loop the leader around the shock cord and thread it back through the sleeve. Tighten this loop so it is snug against the shock cord. Make a larger loop with the other end of the leader and thread that end through the sleeve. Crimp the sleeve and trim the excess leader. Crimping.jpg And you are done. Finished-Loop-1.jpg Slide the shock cord ring over your rod. Installed Loop.jpg GO FISHING! BTW, as shown in the photo above, the Leash Loop can also double as a place to hook your lure to keep it out of the way when not in use. I have a couple other simple projects that I will post soon. If you have something to share, let us see it. Bob Last edited by Iceman; 01-21-2010 at 08:56 AM. |

|

|
|
12-07-2009, 05:36 PM
|
#2 |
|
Junior
Join Date: Sep 2009
Location: Gardena
Posts: 3
|
Cool idea, I just clip my leash to a zip tie below the first guide and above the reel (Same zip tie that I use when I go LR fishing). The zip tie serves as a rod holder on the LR boats (loops on the fish sack hooks by the bait tanks) and a leash clip for my Kayak.
|
|
|
|
|
12-07-2009, 09:18 PM
|
#3 |
|
Wayne

Join Date: Dec 2008
Location: Carlsbad, CA
Posts: 98
|
Innovations
You might want to do something like this to keep kelp polyps, grass and crap out of the intake tube of your new bait tank. I used pure silver wire bought from a bead shop so it won't corrode. Not as simple as a screen, but I like the way it looks and works. I know it won't fall off.
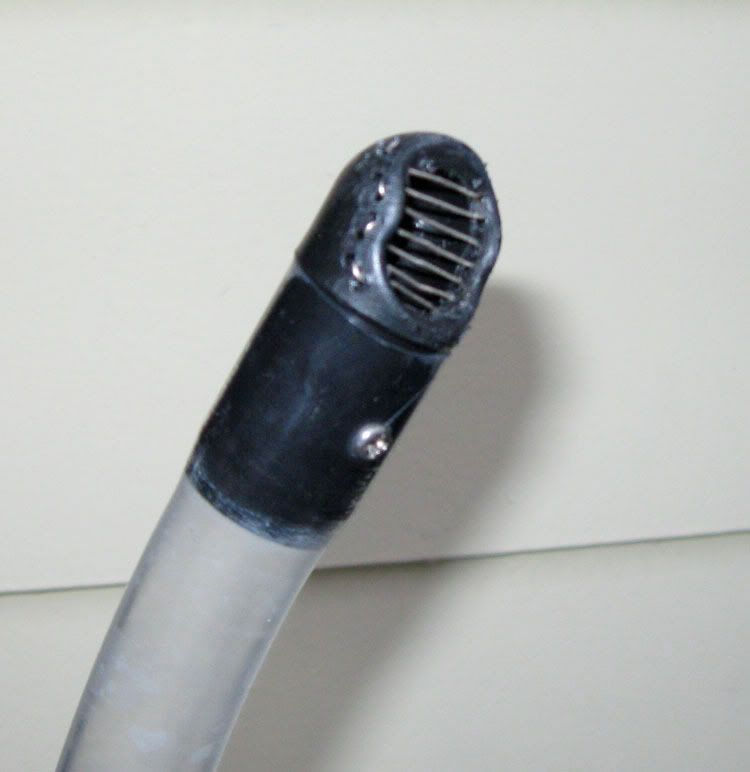 Also, be careful of the collar around the outflow tube. It can come loose if your not careful. Wayne |
|
|
|
|
12-11-2009, 02:38 PM
|
#4 |
|
Olivenhain Bob
Join Date: May 2008
Location: Olivenhain, CA
Posts: 1,124
|
Homemade Gear Leash
I have not been happy with the leashes that I have found for sale. The ones using shock cord are too heavy and the cord exerts too much pressure when stretched. The ones that work well are kind of expensive. In today's class, I will show you how to make one at home for almost nothing.
Like most people, I have a bunch of old cell phone car chargers hanging around. Every new phone I get seems to require a different plug and therefore a new car charger. For this project we will be putting the curly cables from those old charges to a new use. Start by cutting both ends off an old cable. If you don't have one, you can use a phone handset cable, ($5 at Home Depot). Cut.jpg Plastic snap clips that are easy to use are hard to find. I found something usable at REI, ($2 for a pair of clips). These clips have to be modified a bit. Spread the clip apart and pull the strap attach point out. Slide a 3/4" piece of shrink wrap over the cord and then thread the cord through the hole in the snap clip. Slide a large crimp sleeve over the end of the cord and pull the end of the cord as far through the sleeve as you can. You may have to trim some of the cord material in order to get it to fit into the sleeve. Trim the cord so it is flush with the end of the sleeve Sleave.jpg Take a sheet metal screw and screw it into the open end of the sleeve leaving about 1/16" gap between the screw head and the sleeve. Crimp the sleeve over the screw threads. End.jpg Spread the clip again and pull the cord so that the sleeve slides into the clip body and the screw head seats itself in place. Assembly.jpg Crimp the bottom of the sleeve around the cord. Slide the shrink wrap as far as you can up toward the screw and heat to shrink the material. The final result will look like this. Finished-Leash.jpg I like this leash better than any I have seen in stores. It stretches to over seven feet and recoils out of the way. Perfect for rods. You could make shorter ones for things like gaffs, pliers or Hobie Mirage drives that are used in more confined areas. Bob Last edited by dsafety; 12-12-2009 at 06:36 AM. |
|
|
|
|
12-11-2009, 04:17 PM
|
#5 |
|
Senior Member
Join Date: Nov 2009
Posts: 149
|
Cool stuff.
|
|
|
|
|
12-11-2009, 07:55 PM
|
#6 |
|
Senior Member

Join Date: Sep 2006
Location: Bay Ho
Posts: 1,382
|
OK.....Mr. and Mrs. Sea Bass the time is almost upon us so I will share a little.
These are (2) of the finest improvised Kayak Fishing tools I have used. The first is a New Silent Kelp Clip for those WSB missions that take you into the spaghetti. This clip takes up No room at all, nor does it make any metallic sound. Its very easy to use, Just grab 2 or 3 single strands of kelp and Cuff it. Tie the other end to your kayak. It will not slip do to wind or current, and you do not have to pile 25 lbs. of salad on your Kayak to anchor. -A joint venture between Me and Elbie. ----------------------- Item #2 is a De- Hooking Tool for your Sabiki Rig. Hold it by the Cork End and use the hook end to grab the line in front of your hooked Mackerel. Just lift and it will invert the hook letting the Mackerel fall off. Never again will you have to deal with pliers, or your bare hand around those nasty hooks. This thing work like magic. Yes, it floats. -I first started using a piece of coat hanger, and making 2 tight loops and a short shaft with the hooked end. I would wear it on my finger like a ring. I gave away a bunch of them at the launch every time somebody would ask..What the hell is that ? ..I gave them one.  -This type you see here is the 2nd generation version that has been improved upon by Rick Robinson. Its a Brass Rod (no rust) and a Champagne Cork. He now operates a factory in China and sells them by the gross.  
Last edited by Billy V; 12-11-2009 at 08:17 PM. |
|
|
|
|
12-11-2009, 10:05 PM
|
#7 |
|
Guerro Grande

Join Date: Jan 2006
Location: Houston, TX
Posts: 629
|
I added a nut protector/gimbal-type device to my hatch. It gives you a sturdy place to plant the rod butt on extended fights. The positioning on this one was a little off and it left the rod in a slightly awkward position. My next one will have an extension that will move it farther back towards me. On launch and landing I just turn the hatch around and its out of the way.
 I make my own leashes. 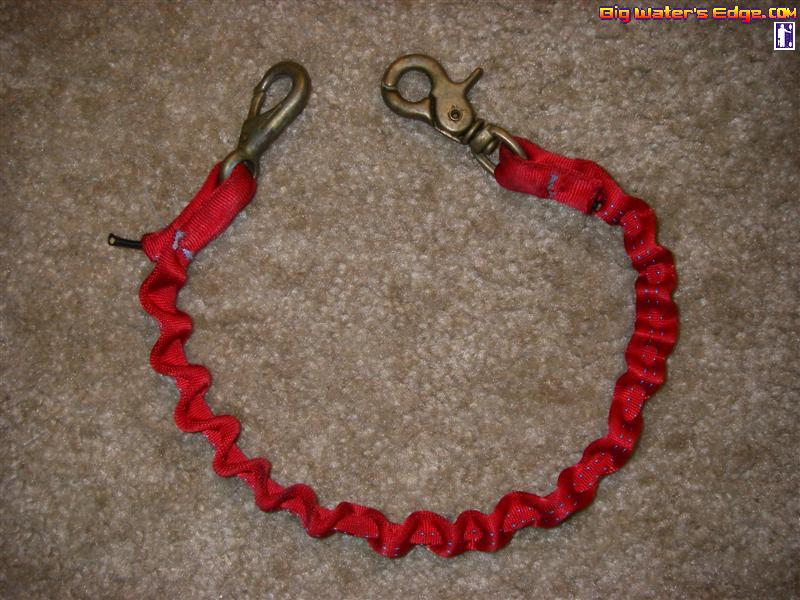 I use hollow nylon strap (blue stuff on left), thin bungee cord (black) and brass snap hooks. 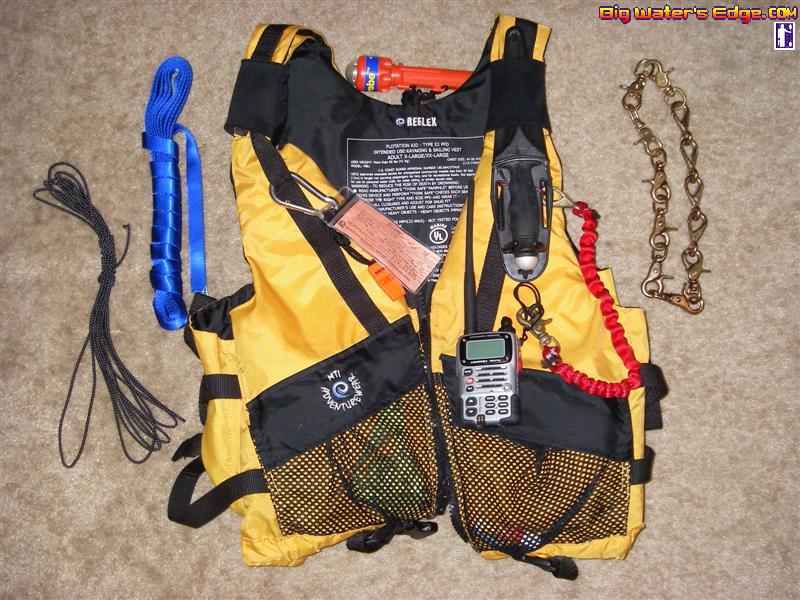 You cut the bungee cord about 50-70% the length of the strap (depends on the thickness and pliability of the strap). I unfold a coat hanger, bend back an inch at one end of the hanger, slip it through the strap, double the bungee around the hook and pull it back through. You gather the strap onto the bungee and secure both ends. The strap end is fed through the swivel of the snap hook, folded over onto itself, and sewn into place with nylon thread. It takes a little time and you need to have good sewing needles (upholstery or leather needles work well). I have been able to knock out five or six in an evening I use SS rings (split or solid) as the leash attachment point for my rods. They are held on with big, UV resistant zip ties. 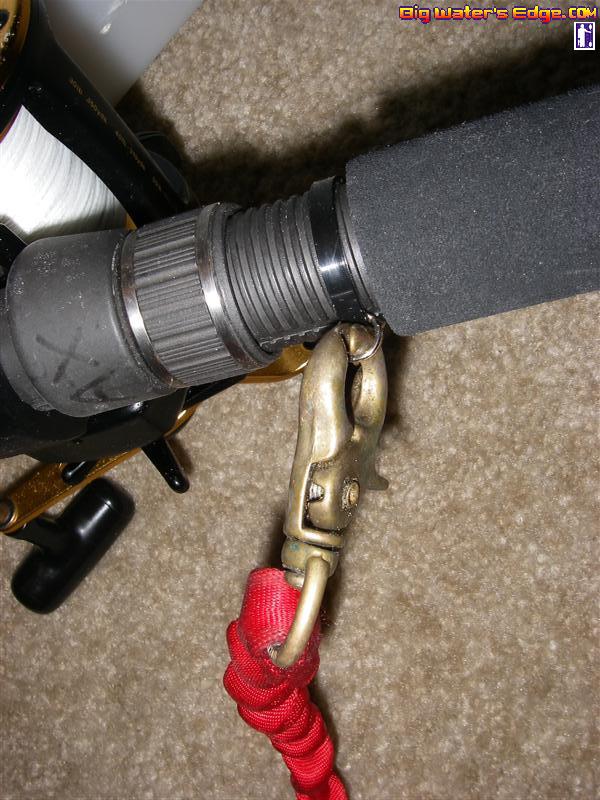 If you run electrical wires or cables the length of your yak, you might want to route them along the underside of the deck, to keep the bottom of the yak clear for rod storage. I used short sections of aluminum angle or C channel attached to the underside of the deck. 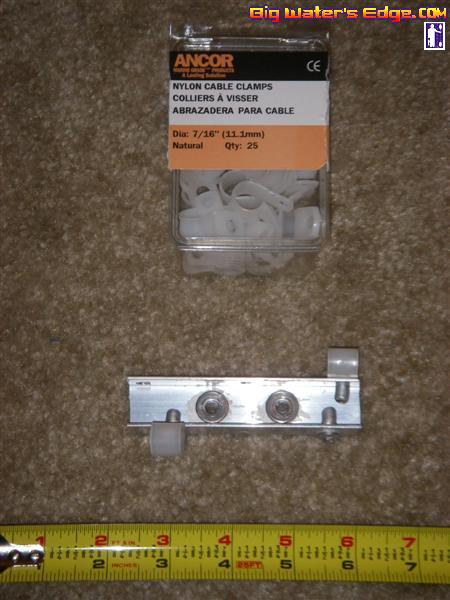 The aluminum channel also served as a backer for the RAM tube rod holders mounted on the deck above. This provided greater strength for the RAM mount and also gave me an attachment point for cable routing. I riveted nylon cable hangers to the lips on the C channel. For easy wiring changes, you should cut the nylon cable hangers at the base of the loop. It will hold the wires securely, but you can still bend it back and pull them out. The rigors of use in a kayak can cause battery terminals to fail. They are prone to corrosion and repeatedly connecting and disconnecting can put a lot of mechanical strain on them. To avoid this, I permanently attach a wire harness to the battery. 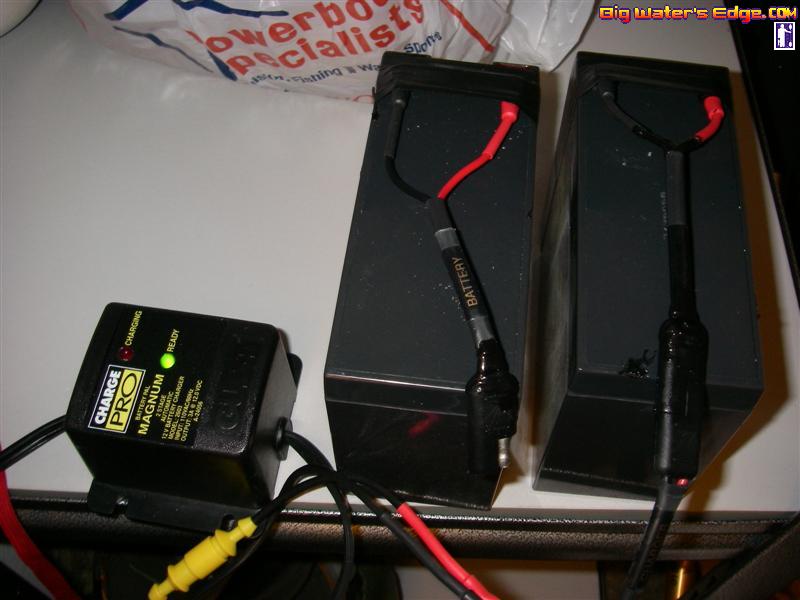 I use waterproof trailer plugs like these 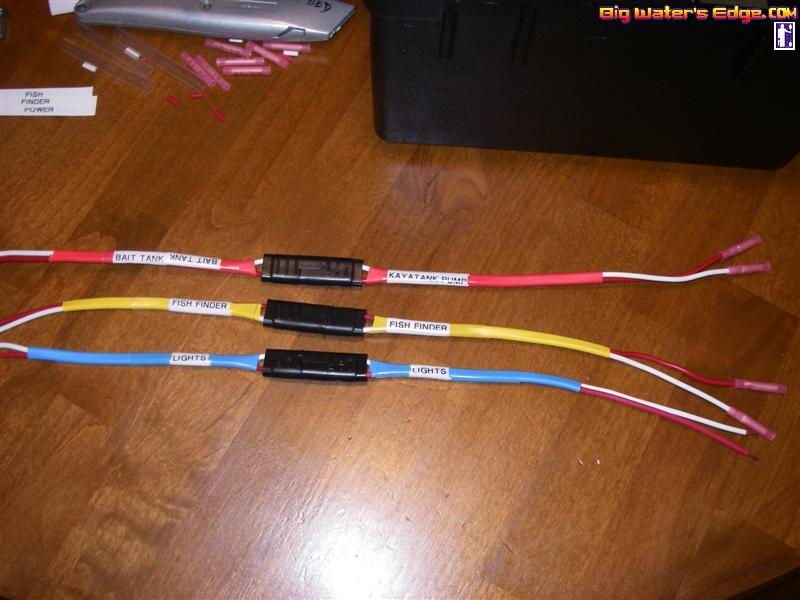 I crimp terminal lugs to one end and then attach them to the battery. Once attached, the terminals and lugs are heavily coated with dielectric grease and then taped over with electrical tape. The harness never comes off the battery after that. The other side of the plug is attached to the buss bars for the electrical distribution system. The plugs are much more durable than the battery terminals. My battery charger has a similar plug attached to the leads. This allows me to easily pull the battery and hook it up to the charger.
__________________
Douglas Gaxiola  Team No Fish- Amateur Staff Team No Fish- Amateur Staff |
|
|
|
|
12-11-2009, 10:32 PM
|
#8 | |
|
Senior Member

Join Date: Sep 2005
Posts: 1,922
|
Quote:
 Makes life sooo much easier. I just do a rough wire to the terminals, sealed by marine goop. Do this with new wires and and new battery, before salt water has a chance to corrode it. Very durable, low maintenance, works. Di-electric grease is good on the connection ends too. For the newbies, dgax65 is one of the innovative masters. If you have it on your yak, most likely it was inspired by dgax65. Look up his old posts before you rig up a yak. I'll say it again...
|
|
|
|
|
|
12-12-2009, 03:30 AM
|
#9 |
|
.......

Join Date: Jan 2009
Posts: 1,509
|
OK I'll bite....
I hoopnet a bunch and I made some gadgets for my FND for hoop netting.
 Here's the general rig:  It consists of a lobster box in the rear, pedestal for electronics up front and a lighted boom with a block for pulling up the nets. Here's the box it's held in by the straps of the seat and the clips.  It doubles as a net rack, here it is with one of my folding nets I made for it. (my nets are smaller then the Danielson and Promars but taller which makes them easier to pull from a kayak)  and it's got more then enough room to store a limit of bugs or for that matter my hoop floats.  The boom is pretty simple: It has a custom block that I made on the end.   It's lighted with red LEDS for sorting lobsters  Wiyth the red light you can see the bugs but it does not effect your night vision The little pedestal gives me a place for my spot and GPS and or fishfinder.  The block lines up right with the edge of the yak so you can pull as hard as you want and it doesn't try to pull you over.  The Boom also pulls out of it's holder so you can store it under the deck when your not pulling nets. The pedestal itself comes out by just pulling a few nuts at the base, and a bolt.  I have a small pedestal that sits on the main hatch for fishing. I just switch out the rear storage for an oversized bait tank I made and I'm good for fishing Sardines all day for halibut in the bay.  The FND is no longer my Kayak of choice for most fishing unless I'm fishing local and want to carry a ton of bait but it's great for hooping. I've Hooped this setup for three years now and it's good enough for what I want to do with it. I can't think of anything I'd add or change on it. It just makes hooping so much easier, and because of that I can hoop longer when the hooping is slow..... Jim Last edited by Fiskadoro; 12-12-2009 at 11:14 AM. |
|
|
|
|
12-12-2009, 08:16 PM
|
#10 |
|
Senior Member
Join Date: Feb 2007
Location: O.C.
Posts: 352
|
Cheap Tricks
Cheap Tricks (No, not the 70’s rock ’n’ roll band) I enjoy kayak fishing not only for the thrill of catching fish while seated six inches off the ocean in the middle of nowhere, but also for the many creative ways of outfitting the kayak and creating kayak-related fishing gear. Saving a few bucks doesn’t hurt either. A few that work for me: PlugCvr.jpg 1 - Fishfinder (Eagle) plug protection: A 3/8” screw protector cover, available in the parts bins at Home Depot or Lowe’s, for around $.50. For use on those days when you don’t attach your fishfinder or if you store your yak outside. ReelCvr.jpg 2 - Reel Covers: Rather than pay eight bucks and up for a reel cover, which I’ll probably lose anyway, I make my own for about $1.25 from one of those soda/beer can neoprene insulators, and a piece of Velcro strap. Can coolers about $1 at Walmart and a pack of the Velcro straps for a few bucks from Walmart, Home Depot, etc. These insulated can “koozies” seem to fit calcuttas, lunas, and small avets pretty well and can help eliminate a lot of future “boat rash” on the reel. 3 - Sacrificial Wear Strips: Several layers of duct tape strips on the keel of your yak, and some transparent packing tape strips on the critical areas of that nice gold baitcaster you just got. They’ll need to be replaced every few trips. ScotchGuard.jpg 4 - Rod Cork Grip Protection: I spray the cork grips on my inshore rods with Scotchguard, the type for outdoor goods like tents and such. Helps make the grips easier to clean and prevents blood and grime from getting ground into the cork. Will take overnight to dry but doesn’t seem to discolor the cork. 5 - Paddle Leash: Can’t seem to figure out why someone would spend big bucks on some super light, high-end paddle, just to save a few ounces of weight, and then tether it to the yak with a 10 ounce wet leash. I make mine from some thin poly rope – weighs next to nothing and doesn’t stay wet. |
|
|
|
|
12-14-2009, 06:55 AM
|
#11 |
|
Guerro Grande
Join Date: Jan 2006
Location: Houston, TX
Posts: 629
|
Jim Day takes the tittle as KING OF ALL KAYAK MODIFICATION.
He should have his own shown on TLC or the Discovery Channel - American Kayak. He could be the Paul Sr., Paul Jr. and Vinnie all wrapped into one. Nice work.
__________________
Douglas Gaxiola Team No Fish- Amateur Staff |
|
|
|
|
12-17-2009, 10:34 AM
|
#12 |
|
Administrator

Join Date: Mar 2005
Location: 1-2 miles off the point
Posts: 6,948
|
12 volt portable fits in the sail mount with a RAM wedge mount. 5 amp 12 volt has about 20 hours run time between charging. extra transducer cable coiled inside case as well as an in line fuse. transducer arm is starboard.

__________________
 
|
|
|
|
|
12-17-2009, 10:58 AM
|
#13 |
|
Senior Member

Join Date: Nov 2005
Location: Carlsbad,,Halfway up the Hill
Posts: 487
|
Interesting...Andy, with the transducer directly in the water are you getting that much better of a signal vs through the haul...??? en
|
|
|
|
|
12-18-2009, 07:44 PM
|
#14 |
|
Senior Member
Join Date: Mar 2009
Posts: 2,384
|
Here is the one that I like the most from my short time as a kayak fiddler, or is it fidgiter? I wanted to use my rear scuppers for intake and exhaust for my bait tank. This is just a focus on the exhaust which is also used to control the water level (infinitely adjustable) and empty the tank. I took an ordinary PVC compression fitting for 1/2 inch pipe. Here is one cut in half (normally has a fitting on both ends.
 And here it is unscrewed.  Here it is modified and attached to the bottom of the tank (originally the connected end looked just like the bottom in the photo.  The modification was to cut one of the screw on ends in two (careful to leave threads on both end), which made a nut for the bottom of the tank and kept the cap for the seal inside. Here is approximately where I made the cut.  I then screwed the smaller "nut" piece down the threads just far enough to allow the cap to still function when attached. I cut a 1 3/8 inch hole in the bottom of my tank where it would have access to a scupper with the tank installed. The 1 3/8 hole was tight enough that I needed to screw the fitting into the tank, but I also gooped the nut. Now all I had to do was add a piece of PVC pipe through the cap and fitting and tighten the cap. Here it is from the inside in the up/full position.  And here it is in the down/low position.  I ended up cutting the compression fitting in two, to use the other end on my next tank, so here it is now.  A couple of use things I have noticed are that I need to leave the cap fairly loose to allow easy water level adjustment, or tighten it to transport my bait. And simply unscrewing the cap and removing the pipe quickly drains the tank. Also, rubbing the PVC pipe with candle wax helps out. |
|
|
|
|
12-19-2009, 10:39 AM
|
#15 |
|
Senior Member
Join Date: Apr 2005
Posts: 286
|
__________________
 |
|
|
|
|
12-19-2009, 03:37 PM
|
#16 |
|
Guerro Grande
Join Date: Jan 2006
Location: Houston, TX
Posts: 629
|
Brian
Don't forget your greatest engineering feat - the combination rod holder/evaporative cooling system/roll bar.  That thing was super bitchin' 
__________________
Douglas Gaxiola Team No Fish- Amateur Staff |
|
|
|
|
12-20-2009, 04:47 PM
|
#17 |
|
Junior
Join Date: Mar 2007
Location: Huntington Beach
Posts: 26
|
For coilcord, try the 99cent stores. Sometimes they have it, sometimes they don't
|
|
|
|
|
12-22-2009, 12:43 PM
|
#18 |
|
Senior Member
Join Date: Mar 2005
Location: Jamul, CA
Posts: 243
|
The Bait Bazooka.
 
__________________
Thanks, bluesquids |
|
|
|
|
01-06-2010, 08:57 PM
|
#19 |
|
Olivenhain Bob
Join Date: May 2008
Location: Olivenhain, CA
Posts: 1,124
|
Bump
Come on guys, you have to have some more good stuff to share. Bob |
|
|
|
|
01-11-2010, 10:58 AM
|
#20 |
|
Administrator
Join Date: Mar 2005
Location: 1-2 miles off the point
Posts: 6,948
|
RPG BLING
__________________
|
|
|
|
|
| Tags |
| kayak fishing inovations, kayak rigging ideas |
| Thread Tools | |
| Display Modes | |
|
|


 Linear Mode

