|
|||||||
| Home | Forum | Online Store | Information | LJ Webcam | Gallery | Register | FAQ | Community | Calendar | Today's Posts | Search |
 |
|
|
Thread Tools | Display Modes |
|
|
 03-24-2014, 08:55 PM
|
#1 |
|
Brandon

Join Date: Jul 2011
Location: San Diego
Posts: 2,345
|
And it works.
|

|

|
|
08-13-2014, 10:23 AM
|
#2 |
|
Senior Member
Join Date: Apr 2012
Posts: 291
|
reel covers
not my original idea but didn't see anybody post it yet. They work great especially for the bigger reels
|
|
|
|
|
11-20-2014, 01:42 PM
|
#3 |
|
Junior
Join Date: Sep 2014
Location: Louisville, TN
Posts: 6
|
Add on to the stealth 12.
Grabbing extra poles are easy from the stock rear holders, But being a short person I had problems reaching my extra poles, net or gaff from the stock front pole holders. The 2012 has threaded inserts behind the seat so with a piece of aluminum square stock screwed into them and four scotty mounts I fixed that problem. Now i can reach all my gear from behind me. this is what the finished product looks like.
Having four additional mounts without drilling any holes in the kayak makes it easy to change the layout when needed. This also makes it easy to remove if I were to sell it to someone that didn't want the extra mounts behind them. Also with the built in bait well I don't need to reach behind me for a bait bucket. |
|
|
|
|
12-21-2014, 11:56 AM
|
#4 |
|
Senior Member
Join Date: Feb 2013
Location: San Diego
Posts: 619
|
Had to redo PVC Rod holder on the yak. It works great and gives you back support.
|
|
|
|
|
12-21-2014, 12:17 PM
|
#5 |
|
Senior Member

Join Date: Mar 2010
Posts: 1,972
|
Painted black! Much better than pvc white!!! Good job Nick! Jim
|
|
|
|
|
12-22-2014, 08:42 AM
|
#6 |
|
Currently @ MLO Territory

Join Date: Dec 2010
Location: Under the Shadow
Posts: 2,290
|
Torqeedo Cavitation Problem Solved!
i was lossing about 2mph when hitting max speed on my torqeedo. So i gave it some thought and went down every row at Home depot. I came across the plastic conduit boxes in the electrical row and I said to myself this just might work!
You would think with a 1600 motor they would have all these problems solved.... Fix cost me $18.00 One Torqeedo Lower clamp ring 069-0011 $7.00 Plastic Conduit Box $11.00 one camp ring $.45 it did, i hit 5.4 mph on the torqeedo at max speed without it picking up air. 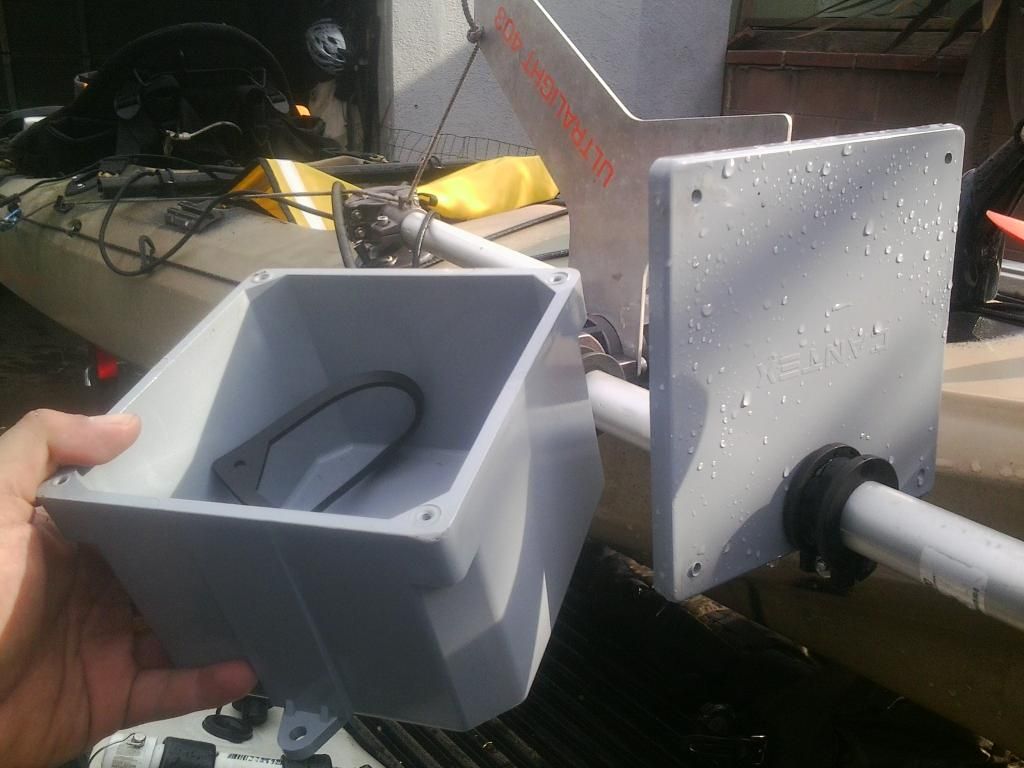 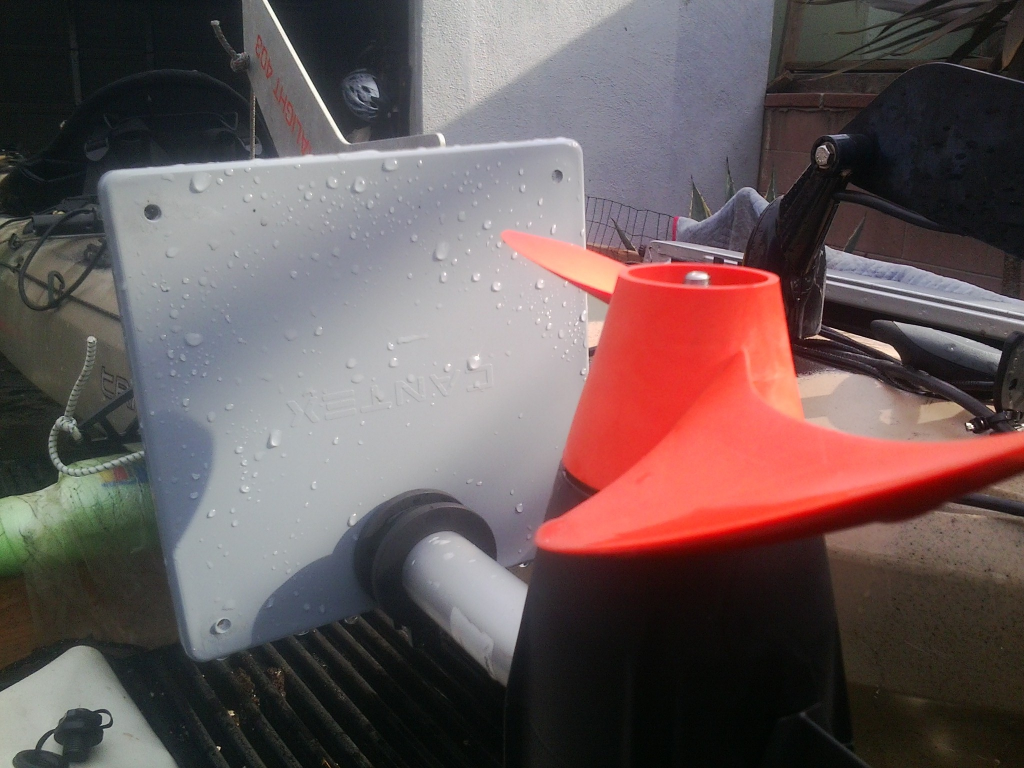 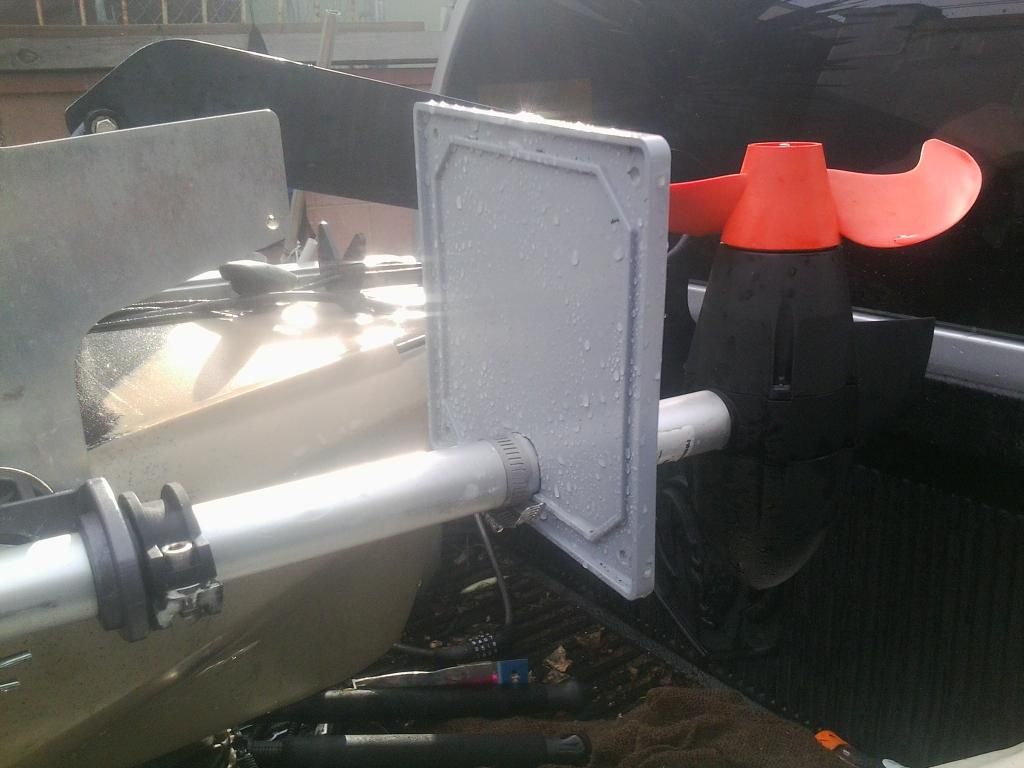
__________________
 Team: Disbanded You only have one chance in this life...make the right decision(s)...so you don't regret it
|
|
|
|
|
12-22-2014, 09:47 AM
|
#7 | |
|
Senior Member

Join Date: Apr 2010
Posts: 6,856
|
Quote:
Its a great idea, it looks like it will work similar to a trim tab. However  ........ ........How are you keeping it from going sideways? If one of the sides gets kelp or grass or whatever caught in on it the drag of whatever is hung up on it will cause the tab to turn sideways. If the tab is sideways my guess is that the motion of the kayak going up & down will cause drag on whatever side the tab is on and will in turn cause the kayak to go down or up in a sideways motion. I'm thinking that you'll have the same results when you're turning in rough seas. With the above being said another thing that can happen is that the up & down motion of the kayak will result in unwanted pressure being placed on the plate and may cause it to snap, best thing that can happen is that the plate will snap and your pole will remain straight. Anyway......that's my thought. good luck 
__________________
 www.facebook.com/Teamsewer |
|
|
|
|
|
12-22-2014, 09:58 AM
|
#8 | |
|
Currently @ MLO Territory
Join Date: Dec 2010
Location: Under the Shadow
Posts: 2,290
|
Quote:
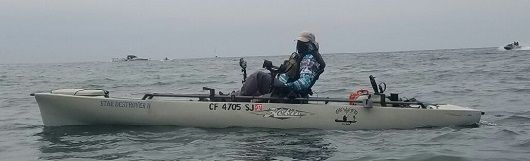
the 6 hours I spent in the ocean the other day didn't budge it, so I guess its still good. If it does move ill just readjust with my paddle.
__________________
Team: Disbanded You only have one chance in this life...make the right decision(s)...so you don't regret it
|
|
|
|
|
|
03-29-2015, 08:13 PM
|
#9 |
|
"Broke like a joke"
Join Date: Jan 2013
Location: San Diego
Posts: 110
|
pvc pipe
did something like that for my kayak but used an adaptor to go up to an 1 1/2"
|
|
|
|
|
04-13-2015, 09:15 PM
|
#10 |
|
Senior Member

Join Date: May 2013
Posts: 157
|
I know another member recently used plastic toy car wheels to make a dolly but figured I'd share my design as well... Found a kids atv in a trash pile and snagged the wheels to make my dolly. Total cost...about $25 in PVC tube and couplers. Hopefully these big plastic wheels roll over the sand better than my previous narrow wheels.
 
__________________
fish forever, work whenever |
|
|
|
|
04-25-2015, 04:08 PM
|
#11 |
|
No Pray, No Pay!!

Join Date: Apr 2015
Location: Costa Mesa, CA
Posts: 27
|
some great ideas, thank you...

|
|
|
|
|
08-31-2015, 12:23 PM
|
#12 |
|
Newby
Join Date: Jan 2012
Location: Menifee, CA
Posts: 6
 |
Fish Bag!
After almost losing my YT to a Hammer, while on a fish clip a couple weeks back, I decided to get an insulated fish bag to accommodate my long paddles in hot temps and sharky waters. Found a nice product on Amazon for $120, but procrastinated too long before ordering and wanted to fish last weekend. So, I went to Lowes and bought some reflective insulation material, Silicone caulk, Velcro pads, and foil tape. $35 and an hour later, I had a Redneck fish bag to fit perfectly in the rear and under the bungies of my Stealth-14! I took (2) 7lb bags of ice; which I kept below in a collapsible cooler in the front hatch, until needed. After picking up a small YT and a Bonito, I emptied one bag of ice in the foil bag along with the bled fishes. 2 nice 15-16lb YT tail and a Bonito later, I added the second bag of ice. Caught a 3rd respectable yellowtail on the paddle in, which I slid under the bag, being it was already bulging! I did roll it in the surf, not surprising with my heavily loaded yak plus the added 80lbs of fish in the trunk. BUT, surprising the bag held up nicely, and was floating alongside and easy to retrieve. Had to look around for a minute to find the "loose" YT being tossed in the surf; which a nice gal retrieved for me, during this sharky "closed-beach" day in LaJolla! After a 10 hour day on the water, I still had a 3/4 bag of un-melted ice, and the fish were nice and cool. The only difficulty was cleaning the bag.... which I expected would be a one-time disposable and shreaded from fins anyhow? I simply opened up one long seam to wash thoroughly which I will later need to retape. Caulk did not do much for adding strength, but did keep the blood and fish juices from draining through the scupper! Also on a bad fish day, it could double as a tanning reflector..... or on a real bad day, a good way to signal aircraft or give a shark something to chew on (maybe they love popping bubbles too?)!
P.S. cooler in the pic is Mega-size with a 39" I.D. |
|
|
|
|
08-31-2015, 02:13 PM
|
#13 | |
|
Senior Member

Join Date: Apr 2012
Location: Carlsbad Ca.
Posts: 1,206
|
Quote:
Good job and thanks for sharing.
__________________
[SIGPIC] |
|
|
|
|
|
09-01-2015, 12:09 PM
|
#14 |
|
Senior Member

Join Date: Sep 2011
Location: San Diego
Posts: 901
|
Sabiki Bait Cage
Cost: Free with a rock and I guess the forfeit of the CRV.
|
|
|
|
|
10-29-2015, 08:59 AM
|
#15 |
|
Junior
Join Date: Oct 2015
Posts: 26
|
IRON BUCKET!
Hey guys. I saw a guy with one of these but i couldn't find any DIY's so i decided to make one:
Need a place to store your irons?   What you need: Bucket Bucket Lid Utility Knife Dremel tool Drill Bit Drill (You can use dremel tool as well) IRONS! Cut the inner circle off and the outer lip off with the utility knife!  The outer lip wraps around the outside of the bucket (this is the part that has to go) and the inner lip stays inside the bucket (do not cut this off)  Smooth out lid with dremel  Slide lid down halfway and drill out holes  Now add your irons in and voila! You have a safe way of transporting and storing your irons. The lid sits tightly inside and does not require glue; you can remove the lid and use the bucket when needed.  I drilled my holes out with my dremel tool so it came out looking pretty rough; I also did not bother smoothing out the inner circle. If you want yours looking better than mine, use a drill for the holes and smooth out the inner circle with dremel Last edited by Deez Knots!; 10-29-2015 at 11:28 AM. |
|
|
|
|
11-02-2015, 06:07 AM
|
#16 |
|
Member
Join Date: Dec 2011
Location: Tehachapi
Posts: 81
|
Catayackamaran..uh, yeah.
I did this to get my wife out with me. She does not have the confidence in her vision and balance to go it alone. It sails pretty well, surprisingly well. I have not had another person on it yet, and don't know how it will act, but expect it to be fine. No Hobies were harmed in this mod. Everything is removable. I know, I'm a Kook.
|
|
|
|
|
11-16-2015, 01:35 PM
|
#17 |
|
Member
Join Date: May 2013
Location: San Diego - North County
Posts: 82
|
HFT cart wheels
I broke the plastic Hobie wheels bouncing my fully loaded yak off a curb on the way back to the truck... I wanted something, wider, stronger and less expensive than the nice fat Hobie sand wheels.
HFT had a sale: $5 each. Axle cost $9. Bolts, washers, nuts, cotter pins, $5. total rated capacity for this should be over 600 lbs...more than needed for a 180 lb PA14! The hubs on these bolt in, so I replaced the bolts with longer ones to create dualies and threaded the end of the axle for a nut with a cotter pin to keep it from walking. Last edited by Hammerhead_77; 11-16-2015 at 01:53 PM. |
|
|
|
|
12-30-2015, 05:56 PM
|
#18 | |
|
Senior Member
Join Date: Oct 2011
Posts: 221
|
Quote:
Awesome Jig buckets rule...been trying to find a commercial product now I can just DIY. Thanks for the post. |
|
|
|
|
|
12-31-2015, 12:16 AM
|
#19 |
|
Senior Member

Join Date: May 2014
Location: Fort Lauderdale
Posts: 1,985
|
PA14 with oversized ruddar, and ruddar protector for transport
|
|
|
|
|
12-31-2015, 12:23 AM
|
#20 |
|
Senior Member
Join Date: May 2014
Location: Fort Lauderdale
Posts: 1,985
|
Downrigger Mounted
|
|
|
|
|
| Tags |
| kayak fishing inovations, kayak rigging ideas |
|
|


 Hybrid Mode
