|
|||||||
| Home | Forum | Online Store | Information | LJ Webcam | Gallery | Register | FAQ | Community | Calendar | Today's Posts | Search |
 |
|
|
Thread Tools | Display Modes |
 01-25-2009, 12:38 AM
|
#1 |
|
.......

Join Date: Jan 2009
Posts: 1,509
|
Rigging and Review my X-13
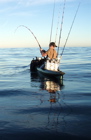
Now I don't know why I have a "color" my first yak I made and it's mahogany and white. My FND is lime green only because my buddy Oliver had it first and sold it to me when he left the country. True I have a Lime green Mini-X but that's just because I got a deal on it, and I'm I'm cheap. Now with my third green yak I guess I'm stuck. At least I like green...LOL For those who don't know Andy sometimes get's "blem" yaks that the factory says are not quite up to par, and he sells them at a discount. It's a great way to get a new yak at a cheaper price. I buy most of my gear used but with Kayaks I like to buy them new so I can set them up my way versus the standard setups people use. In this case the X-13 I bought is uneven in it's thickness. Thicker then normal in the hull and a little thinner topside. Suits me fine I like thick hulls, and the reduction of weight topside. My M-X and X-13 are both blem yaks and I have no complaints with either of them. Here's the pic he sent me:  I already knew the x-13 design already, and had been looking hard at them. I've also seen a lot of good reviews, and previously picked Andy's brain on the model and how it was working out. One thing I like about Andy is that he's great for a no BS assessment, and always gives you the straight up word on Yaks whether, he personally sells them or not. Right now I think Kayaks are going through a transition phase as they make hulls that are more in tune with what we really use them for. Some of the makers are going to get left behind if they do not keep up. I'm pretty confident that I can tell a good hull and know what I want in a design and the x-13 had some features wanted and had a very good shape to it's hull. With the X-13 Malibu has gone from their standard tri-hullish shape to a more streamlined rounded chine boat, pretty similar to a Prowler 13 in shape. I liked the layout better then the Prowler, the fact it had a forward self bailing integrated fish hold, and a large center hatch, the seats also further back which should help when surfing into shore. It also looked faster then my Mini-X with the longer water line and cleaner lines, and it had enough capacity for a bait tank which is a plus. Bait and more speed, win-win for me. Bottom line... Andy basically offered me a deal I could not refuse, on a Yak I was already sold on, so I went down to Sunset Beach and bought it on the spot. I didn't even bother paddling it. I don't know about you guys but once I like something set up wise I keep using it. I suppose a normal sane man would taken the new kayak out paddled it around for fun first and figured out what he needed. I just went straight to rigging it. I set up the X-13 fishing the way I do it: pretty much just like my Mini-X with the exception of the new bait tank I built specifically for it, and a flush mount internal/external transducer. I like the double rods forward for fishing Halibut, both for for bounce balling and drifting because the kayak tracks straight with a rod to each side, and you can also see both rod tips as you are paddling or drifting. The rod holders I like are Scotty's with six inch extensions. They are set up so that they are exactly two inches forward of the farthest reach of my paddle stroke, and I have the same setup on my Mini-x.  There are two things you got to watch out for. One you want the mount far enough forward that you won't hit it even on your farthest forward stroke and two you want to set up the holder so the rod is angled forward exactly parallel with your paddle as it goes into the water. That way when the rod is in the holder angled forward for trolling or bounce balling you can't possibly hit it with the paddle.. I like the through bolt flush style mounts as they definitely are the strongest cleanest way to go. With the x-13 though I had to make a few spacers to get them to work.   Bait tank wise the idea was to make a good low profile tank that would work better then a five gallon bucket. Most Kaykers are using a five gallon bucket with a 500 GPH pump throwing water directly into it sideways like a garden hose. I don't care what anybody says. That just beats the crap out of bait it. That much flow through a small space unbuffered or baffled just eats through bait. Because sardines and chovies are not designed for fast moving water. My take is that a kayak tank should have the same features as a real boat bait tank. A subdued baffled directional flow, and enough circumference for the bait to circle with no corners for it to run into. Another thing I hate about five gallon buckets is they are too tall and narrow which increases your center of gravity. I wanted a bigger diameter tank that was shorter to give the bait more room to swim with the same amount of water, with a lower center of gravity. That would be kinder to the bait, and the paddler as well. I already built a tank like that for my FND out of aluminum, but it was too big for the X-13 and not everyone can make a tank out of Aluminum. So I wanted to make it from off the shelf stuff I could get cheap, and make it relatively easy to assemble with hand tools..... LOL Here's what I came up with:  Were talking about a cut down Rubbermaid trash can and a cut down Rubbermaid conical lid, reassembled with some pop rivets, a few 12 inch ABS rod holders stuck on the back with screws. It has all the features of my Aluminum tank at a fraction of the cost. People often ask me about building tanks for them and in aluminum I'd just have to charge too much. I could make one of these tanks in an hour or two with around 25 bucks in materials. It holds six gallons full, and pretty much anyone could make it, that is if they are good with basic hand tools like snips and a pop riveter. The coolest feature is the cone shaped top as it it's very easy to dump bait into it at the receiver or get your bait off the sabiki and into the tank. I'm not going to lie it's a great feature and I already really like it. When I first thought it up I'm like...cool, this is going to be great... and it is pretty cool...LOL I rigged up a temporary scupper feed setup for a pump (I will be installing an under deck pump setup later) and it was all ready to try as a prototype. Here's action shots:   I then set up my standard Garmin 398/120 setup , and put in my newest once again reinvented concept of flush mount external transducer.  This is actually kind of I guess a controversial way to do it, as most guys glue their transducers down and beam through the hull. I've tried that it simply works like crap for me. All I can figure is many of these guys have never used a boat with a correctly mounted transducer and don't know what they are missing. I get much better results (maybe twice the performance) my way. I mean honestly I can see the lice on a butts... well butt... with the thing. So there you have it. Jim Last edited by Fiskadoro; 01-25-2009 at 03:18 AM. |

|

|
|
01-25-2009, 07:11 AM
|
#2 |
|
Senior Member
Join Date: Sep 2005
Posts: 1,921
|
I dont think I have ever had problems with my 'ducer, but i think its pretty rad when guys rigging up their yaks think outside the box. Who knows? Maybe iv'e been missing seeing stuff on my finder. Great report Jim

|
|
|
|
|
01-25-2009, 08:32 AM
|
#3 | |
|
Administrator

Join Date: Mar 2005
Location: 1-2 miles off the point
Posts: 6,943
|
From Eagle site: I've always heard 10% signal loss shooting through the kayak hull, but have no source. It comes down to detail at higher depths.
Quote:
__________________
 
|
|
|
|
|
|
01-25-2009, 10:53 AM
|
#4 |
|
Senior Member

Join Date: Mar 2005
Posts: 2,563
|
Very cool write up. 2 posts, 2 on the front page, WTG.
Flush mount external transducer looks neat... I'm sure the reading of your FF is now as good as it gets, but the fact that the hull needs to be cut would make me nervous, especially over time. What did you use to seal it?
__________________
 [------------------------ [------------------------ <)))< ....b-a-a-a-a |
|
|
|
|
01-25-2009, 11:01 AM
|
#5 | |
|
.......
Join Date: Jan 2009
Posts: 1,509
|
Quote:
Not only do you loose depth but just image in general especially fish markings. Exterior mounted I can see for example a single sand bass hanging off the bottom or watch my mega batit drop down to him then actually see it as I jig it up and down at the right height. I just can't get that image as clean through the hull. I got to smile a little at the "new" suction cup mounts. First thing I tried years ago.  It works great for signal but what I didn't like about that setup is that it sometimes came off and caused the yak to pull to the left. For a while I pulled it off and stuck on deck when paddling for speed:  Tried the cylindrical shoot through the hull type as well but finally cut a hole in the hull and mounted normal transducer it like I did with the X-13 except I actually glassed and epoxied it in the hull. If it ever goes bad I'm going to hate to pull it...LOL I'll tell you though it's paid for itself with strong readings to 400ft plus. Cool stuff....Thanks for the responses. Jim Last edited by Fiskadoro; 01-25-2009 at 11:28 AM. |
|
|
|
|
|
01-25-2009, 11:24 AM
|
#6 | |
|
.......
Join Date: Jan 2009
Posts: 1,509
|
Quote:
Here's the components. A Garmin transducer with the top part (mounts) cut off, down to an inch thick in height. Two half inch chunks of neoprene roughly 3" by 5" with the shape of the transducer cut out in the middle of them. A piece of 16 gauge Aluminum the same size as the neoprene with a hole big enough for the transducer and wire connector.  I slathered a bunch of 5200 caulk on the transducer and slid into the first half inch chunk of neoprene, and then I covered the top of the transducer with the caulk as well.  I then put on the second chunk of neoprene and slathered a bunch of 5200 on top of it too.  I then sandwiched the top with the aluminum plate and then smear a bunch of 5200 on the bottom of the neoprene and aluminum sandwich.  I cut a hole in the bottom of the kayak the exact size of the transducer...  ........placed the sandwiched transducer inside so it lined up with the hole and then drilled some small pilot holes up through the whole sandwich through the aluminum. I then used the screws to compress the neoprene which in turned pushed the transducer down through the hole. I started with one then went to the other corner and tightened it evenly down like I was tightening the bolt pattern, (like when you change a tire) until the bottom of the transducer was flush and even with the bottom of kayak. You have to watch it because if you over tighten it will start to deform the bottom of the kayak so you just want it level and tight enough to make a good seal.  Then cleaned the bottom of the transducer off with paint thinner.  Pretty simple. took me about an hour to do it. You get a compression seal with the neoprene as well as the caulking seal by the 5200. If I was going to do another one Id make a template and pre-drill everything as the only hard part was holding everything in place while drilling it. It worked out OK but I would of preferred a more controlled exact spacing for the holes. I initially used normal screws but later changed them out and counter sunk them. for a more flush appearance. Worked fine, did not leak, and it would be easy enough to remove in order to change out for another transducer. Jim |
|
|
|
|
|
01-25-2009, 12:33 PM
|
#7 |
|
Member
Join Date: Mar 2005
Location: Chula Vista, CA
Posts: 65
|
That looks great Jim. I never liked the readings I got when I mounted inside the hull. I rigged my old Extreme with a transducer on the back of the kayak but there was always the turbulence and seaweed catching up on it. I think I might try your application on my next kayak.
Mike |
|
|
|
|
01-25-2009, 01:28 PM
|
#8 |
|
Junior
Join Date: Jan 2009
Posts: 17
|
I love the way you've rigged your X-13. I don't have the stones to do the transducer through the bottom, but I'll probably steal the idea of the concave bait tank lid. I also like to troll with my rods in front of me. I tried using the Mini-X flush mounts, but they were way too far forward and too low to the water. It is also a pain to actually troll 2 live or rigged baits for kings, tarpon, etc because you don't use weight and any pause in paddling tends to get the lines fouled up so with my X-13 I'll just be using the single rod holder mounted in the center console with a height extender. Plus I'm not sure what I'd do with 2 big offshore fish going nuts in a kayak at the same time!
I like my Mango boat, but I loved the Lime Green that they had at another shop. |
|
|
|
|
01-25-2009, 02:14 PM
|
#9 |
|
Senior Member

Join Date: Mar 2005
Posts: 719
|
Jim Day? Jim, didn't you weld a custom bait tank for a FnD?
Though I wouldn't recommend a custom thru hull xducer to most, I believe Jim is one of the few that can pull it off. That is a unique design and should be fine. I believe the off the shlef products work well also, but leave too much material below the hull. The one point of concern is the bond between the poly and the 5200. Jim has practically eliminated that with the big screwws and added for some movement with the padding. I've never liked shoot-thru setups and have been running thru the scrupper with the Extreme and Trident. Good on you Jim. Art |
|
|
|
|
01-25-2009, 02:35 PM
|
#10 |
|
Junior

Join Date: Nov 2008
Location: el cajon
Posts: 15
|
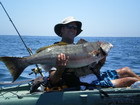
hey Jim sorry this has nothing to do with your post but I caught a fish just like the one you are holding in the pic above and have been wondering what it was for months. Oh ya sweet kayak man!!!
|
|
|
|
|
01-25-2009, 05:54 PM
|
#11 |
|
Senior Member
Join Date: Mar 2005
Location: South of La Jolla...
Posts: 1,193
|
Triggerfish... Nice set up..
__________________
Hmmmm..... |
|
|
|
|
01-25-2009, 06:57 PM
|
#12 |
|
Senior Member
Join Date: Apr 2008
Location: Temecula CA.
Posts: 117
|
I gooped my transducer in the hull only to find out it didnt work when i got out on the water do to air bubbles i assume. i asked another yaker on the water how he rigged his. He just had his transducer in a bag of water in the hull. He gave me a extra bag and so i pulled mine out of the goop and put it in the bag with some water and it worked perfect. its a quick and easy way to do it. your setup looks pretty legit tho. thanks for showing it. its awsome the way this sport keeps advancing.
|
|
|
|
|
01-28-2009, 10:36 AM
|
#13 | |
|
.......
Join Date: Jan 2009
Posts: 1,509
|
Quote:
Here's some photos of that one.   I still have that one and use it on my FND but it was too big and heavy for the x-13. Essentially the new tank has all the features of the larger tank but weighs less and fits the X-13 much better scale wise. You can see the similarities:   Thank all you guys for the responses. Great site. Jim |
|
|
|
|
|
01-28-2009, 12:52 PM
|
#14 | |
|
Senior Member
Join Date: Mar 2008
Posts: 611
|
Quote:
fiesty little guys they are!!!! fun to catch and make great civiche |
|
|
|
|
|
01-29-2009, 06:21 AM
|
#15 |
|
Member

Join Date: Jul 2008
Location: Encinitas
Posts: 600
|
any way you can post build details on the bait tank?
Thanks |
|
|
|
|
|
|


 boat - but at the cost of some loss of sonar performance. (You won't be able to "see" as deep with a shoot-thru-hull transducer as one that's mounted on the transom.) The hull has to be made of solid fiberglass. Don't attempt to shoot through aluminum, wood, or steel hulls. Sound can't pass through air, so if there's any wood, metal, or foam reinforcement, it must be removed from the inside of the hull before installing the transducer. Another disadvantage of the shoot-thru-hull transducer is it can't be adjusted for the best fish arches. Although there are disadvantages to a shoot-thru-hull transducer, the advantages are
 considerable. One, it can't be knocked off by a stump or rock since it's protected inside the hull. Two, since there is nothing protruding into the water flow, it generally works quite well at high speed if it is mounted where a clean laminar flow of water passes over the hull. Three, it can't be fouled by marine growth.

 Linear Mode

