|
|||||||
| Home | Forum | Online Store | Information | LJ Webcam | Gallery | Register | FAQ | Community | Calendar | Today's Posts | Search |
 |
|
|
Thread Tools | Display Modes |
 03-18-2010, 08:09 PM
|
#61 |
|
Junior
Join Date: Mar 2010
Location: Perth, Western Australia
Posts: 5
|
I've managed to find some not acrylic but polycarbonate pipe where i don't have to buy any minimum size. the bloke there is happy for me to take 4 or 5 inches for 10 bucks. I'm sure i'll find the rubber cap somewhere. thanks |

|

|
|
03-21-2010, 06:37 AM
|
#62 |
|
Olivenhain Bob

Join Date: May 2008
Location: Olivenhain, CA
Posts: 1,121
|
Technical Support Announcement
I went out on Saturday and immediately discovered the my Humminbird FF did not work. It gave a reading of 0.8 ft. This has happened before when I went over the canyon and the sonar lost contact with the bottom but today it gave the same reading all the time.
I spent the entire day peddling blind. Even finding bait was a challenge. I am using this as my excuse for getting skunked on this trip. I have been using this system for a couple of months and every time I pulled off the rubber cap to check the water, it was full. This trip, I did not check the water before heading out. Bad decision. When I returned home and checked, I found the well was totally dry. I am not sure why or when the well drained but will be working on figuring that out. Needless to say, checking the water level in the well has been added to my preflight list. If I can find a piece of clear pipe, I will probably pull the ABS well and replace it one of these days. Bob |
|
|
|
|
03-21-2010, 06:42 AM
|
#63 |
|
Senior Member

Join Date: Feb 2010
Location: Clairemont
Posts: 813
|
that sucks Bob,,, but at least you had an excuse for getting shut down, I didn't!
 I hope your fix is an easy one. |
|
|
|
|
03-21-2010, 06:48 PM
|
#64 |
|
Member
Join Date: Sep 2009
Posts: 90
|
Solution?
Duck butter or somekind of synthetic grease?
|
|
|
|
|
03-29-2010, 10:14 AM
|
#65 |
|
Senior Member
Join Date: Nov 2008
Location: San Diego
Posts: 134
|
Thanks
To Bob/ all for the info in this thread..
I have been less than impressed with my FF performance. I decided to pull up some of the foam around my ff and realized that the bubbles in the goop under the foam probably meant bubbles under the ducer as well. I decided to pull it all out.. good thing : 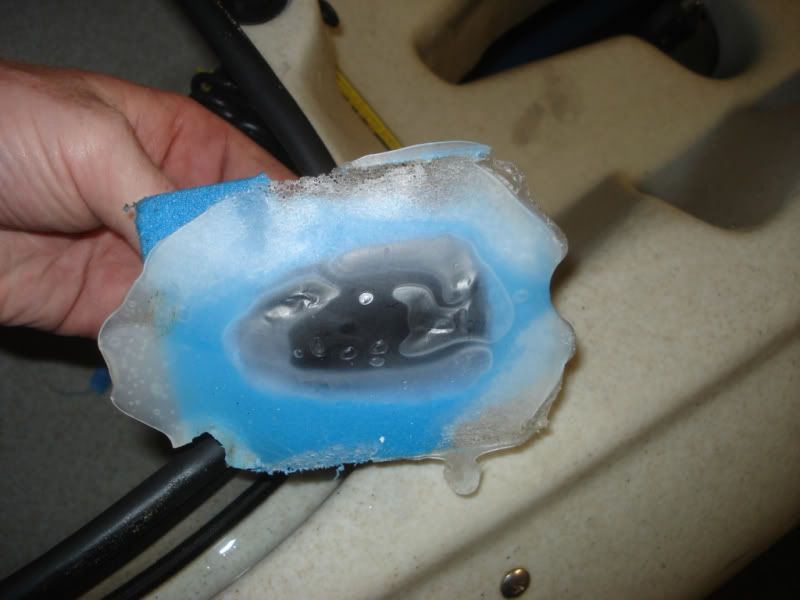 Now, some of the larger air gaps were formed when I pulled this up, but as you can see, there were plenty of small bubbles and areas that had not adhered well. I switched to the wet install, and the first thing I had to do on the water was turn my contrast way down. I also noticed I had to tune the sensitivity. Performance seems to be greatly improved with better bottom contrast and better readings out in deeper water. Has anyone come up with a simple fill/ check plug? I was thinking of running some small diameter tubing (like they sell for refridgerator water lines) with some kind of check valve. My motorcycle's gas cap has a vent tube that that has a one way valve on it.. something like that would probably work well for on the water top-off.. Anyway, this may cause others to second guess their goop installs. If you find what I did though, you can swap it out, and hopefully see what you have been missing! |
|
|
|
|
05-03-2010, 02:30 AM
|
#66 |
|
Junior
Join Date: Mar 2010
Location: Perth, Western Australia
Posts: 5
|
Just an update,
Found a rubber cap, and some acrylic pipe which I belt sanded in to a nice snug fit to the hull. The bolts are temp, shortest S/S I could find in the shed. The blue plastic is just a bigger washer I made and fashioned in to an arrow to indicate direction of tranny. Thanks again Bob and crew |
|
|
|
|
05-03-2010, 12:46 PM
|
#67 |
|
Senior Member
Join Date: Apr 2010
Posts: 175
|
Am I missing the advantage of a wet mount? I am getting that it could mean better resolution, but with the proper installation of a thru-hull, resolution is dandy. With either a thru hull or a wet mount, the trans has to shoot through the plastic of the hull and the saltwater still is a different medium than the fluid you are filling the wet mount container with, just like mounting it in goop.
One thing that I can see being alleviated with the wet mount is the infamous "bubble problem" with goop. But this can be defeated! Here's a few "tricks" that I've used to get rid of the bubbles. I'm sure there are a million and that some of these are well known and that this is a bit off topic, but I'm bored so I will list... 1. When you apply your goop, use a 10 oz cartridge (caulking tube style) rather than the squeeze tube and as you apply, LEAVE THE TIP IN THE GOOP AS YOU SQUEEZE. What I mean is, allow the wet goop to build up around the tip of the caulking tube. Bubbles can be made by essentially "folding in" bubbles as the tip is raised and lowered. I say to use the caulking cartridges and a caulking gun as they are much easier to leave in place while the goop is being squeezed out than while the toothpaste style tube is being squeezed. 2. When you insert the transducer, do not "belly-flop" it or in other words, don't insert it flat into the goop. "Roll" it in from either front to back or back to front or side to side. 3. Use plenty of goop. I'm a fan of making things look clean, but I'm also a fan of making things work. Trying to make the edges of your goop line up with the edges of your trans will mean certain failure. You don't need to fill your hull, but a good amount of goop rather than the exact amount will mean wonders for your resolution. I would say that the area covered by goop extends at least an inch around all sides of my transducer. 4. Warm the tube of goop. This is a good one and a pretty easy "trick". Take a rag and soak it in water. Microwave the rag until its pretty warm/hot. Wrap the goop in the hot rag . This will lower the viscosity (thin) of the goop which will make it far less likely to trap bubbles. The goop will be "runnier" so building a small reservoir out of masking tape prior to pumping in your warmed goop may be a good idea. 5. Slap the hell out of your yak. A couple of good whacks on the underside of your yak with a flat palm may just loosen up some of your air bubbles. By doing these things I've had the same install on the same transducer for 3 years running. Good resolution and nothing to check prior to heading out. But maybe I'm an old school guy and these "new school" wet mount guys will be able to convince me that its the way to go! |
|
|
|
|
05-03-2010, 04:45 PM
|
#68 |
|
Member
Join Date: Jan 2010
Location: Northern Virginia
Posts: 50
|
rayak - love the clear plastic set up. nice seal job as well. did you use 3m 5200? i did and really am sold on the stuff. let us know how your readings work. thanks to bob and some others i am very happy with the wet mount set-up.
|
|
|
|
|
05-03-2010, 05:29 PM
|
#69 |
|
Senior Member

Join Date: Apr 2010
Posts: 6,855
|
Pardon my ignorance but what is the purpose of a 'wet mount transducer'? Will it not work if it's somehow fastened to the hull of a yak without any goop? I'm asking because rather than having to install and remove the ducer each time I go out I want to permanently mount the ducer for my Humminbird 323. Again, not trying to be a dumbsh*t I just need to know before I go and make any installations
|
|
|
|
|
05-03-2010, 05:51 PM
|
#70 |
|
Senior Member

Join Date: Jan 2009
Location: Rancho Cucamonga
Posts: 753
|
Gave up on the Wet Transducer
I gave up on the wet transducer due to leakage and went back to the original goop method. This time, I installed the unit under my Revo seat area. Actually, the resolution is the same between the wet method and conventional. No difference. Just a lot less work.
__________________
GO ARMY BEAT NAVY! Bad decisions make great stories! 
|
|
|
|
|
05-03-2010, 07:28 PM
|
#71 |
|
Olivenhain Bob
Join Date: May 2008
Location: Olivenhain, CA
Posts: 1,121
|
jorluivil, there has been a lot of discussion about mounting transducers in this forum. Search the archives and you will find just about everything there is on the subject.
As for the wet mount vs goop, many of us have found that the performance of a goop mount quickly degrades as the goop gets milky or forms bubbles. The wet mount just uses water as the transmission medium. It works great, as long as you can keep your wet well full of water. Wahoo and others have found that it can be difficult to attach a wet well to the kayak and get the attachment to hold over a long period of time. I had mine come unglued after a particularly tough launch attempt. Some people have recently had success with just attaching their transducer to the hull with straps in the lowest point in the kayak. They then purposely add enough water to make sure the transducer is sitting a a little pool of water. Apparently it does not take much. I do not have first hand experience with this method but it sounds interesting. I do have some experience with the permanent wet well option and can tell you that if you can get a good seal between the well and the hull, the method works great. It is one of the more popular setups these days but plenty of people are doing just fine with other options. Bob |
|
|
|
|
05-03-2010, 08:18 PM
|
#72 |
|
Member
Join Date: Jan 2010
Location: Northern Virginia
Posts: 50
|
i don't take mine out each time. 3 to 4 twists of the hose clamp and the cap slides on and off if needed.
another reason i went this way first is that i would not have to peel goop or epoxy off my ducer if the installation was poor. i would have had to use a ton of goop to make a tranny fit in the sharp "V" portion of my yak. the other areas off to the sides didn't look like good options to me either as they raise up quite high and are also agressively rounded. if you ever flip one over you will see what i am taking about real quick. someday i will use a thru-hull set up but my 135 ride doesn't have the right hull shape for it. to many contours and no real flat"ish" areas. the 2010, 135 ride has a pontoon style hull. some of us love to tinker and making things and trying out ideas is considered a good time (not a waste of time or a pain). i grew up on a farm and was taught how to use all kinds of tools at a young age. this kinda of work is fun, cheap, and well..............just plain interesting to me. i took some tips, asked a bunch of questions, and had a blast putting it together. i have seen many methods.......many work great and to compare you would really have to try them to see. i love my 3m 5200 sealant wet mount for now. |
|
|
|
|
05-03-2010, 08:37 PM
|
#73 |
|
Member
Join Date: Sep 2009
Posts: 90
|
Futile ?
Most sonar manufacturers offer an accessory 'shoot thru puck' that is considerably more compact than using pipe and whatever else you may pimp your yak the crafty cheap way. You can win an Indy car race with a coffee table if you spend enough money modifying it.
|
|
|
|
|
05-03-2010, 08:45 PM
|
#74 |
|
Junior
Join Date: Mar 2010
Location: Perth, Western Australia
Posts: 5
|
Couldn't agree more dtown. I love a good tinker, and really enjoyed putting this together. (I couldn't find 3M, so used a marine grade silicone of some sort, forget the name but it said it had a high bond strength and was for marine applications)
I believe a lot of goop installations work very well, and there all good tips sapdawg but from the little I've read, I believe that some silicones actually form bubbles as they cure, so you it doesn't matter how much care you take to lay it all down. This may not be true for the silicones a lot of people use but I have read that Goop is one of those that will form bubbles during the curing process. Freshwater maybe of a slightly different density to saltwater but there is no reason why you can't fill it with saltwater from your local fishing hole. So whether the goop interferes with the signal or not, I see this wet mount as having one less ingredient. Whether that helps much or not, who really knows, but it can't be a bad thing. I also like the fact that it's removable. I ended up with a spare piece of acrylic after my install so should the boss let me get a second yak i'd be able to switch the unit between the two easily. Lastly, I like the protection it offers the tranny from bumps. Not that there is any reason why you couldn't put a guard around a goop install. I think largely but, goop installs are tried and true. They obviously work, so I'm not bagging them out, but just thought this install looked neat and wanted to have a crack. Thanks all. |
|
|
|
|
05-30-2010, 06:10 AM
|
#75 |
|
Senior Member

Join Date: Mar 2005
Posts: 173
|
Keep it simple
I've been using a wet mount for 5+ years - primarily so that I could easily use my ff/transducer on any of the various boats I've had. Point is the cup in which one places the transducer needs to to do two things only, i.e., accommodate the size of your transducer, and contain the signal medium.
I personally prefer round puck-shape transducers, mate an appropriately-sized ABS coupling to the yak's bottom and then epoxy its fitted-edge down to the hull's inside (Have learned that slow-drying epoxy is best - less brittle & more robust bond than quick dry). Once I'm at the beach, I pour a bit of water into the created reservoir, put the puck in (and attach the ff) and I'm off. It is suprisingly simple and effective for my purposes, with gravity doing its job of holding the puck in place for as long as I'm on the water. I've now done this on 5 different yaks, and in 5 years the only issue has been when quick-dry epoxy let go after a yak fell hull down from my truck bed to the sand. Flex of the hull broke the seal so water leaked out from beneath the ABS reservoir (If someone's really concerned about this, then I suspect vaseline or grease would continue to work even when the reservoir seal gave way). As for down sides, as Andy rightly noted, polyethylene's a bit slow to respond to temperature changes, so transducers w/ built in temp gauges sitting or glued inside a craft will respond accordingly. AE |
|
|
|
|
06-06-2010, 04:03 PM
|
#76 |
|
Junior
Join Date: Jun 2010
Posts: 1
|
I've been having the same problems, with my transducer. It was originally installed, by the Kayak store, with a piece of foam, as the cup, and then vaseline was used inside the cup. It works o.k., until you turn the kayak upside down, then you have vaseline all over the place.
Next try, was with the goop, and then silicone. Both worked for a while, but then I would only get a 0.5 reading. Either, there were bubbles formed, or an adhesion problem. My last attempt, was the wet well. I used silicone to mount the pvc fitting. It worked great for a few trips, and then stopped. The silicone did not seal well enough, and the water leaked out. I have to re-do. I am thinking about, going back to the foam cup, and using a 2 part clear epoxy. Has anyone used the epoxy method? Bill |
|
|
|
|
06-06-2010, 04:07 PM
|
#77 |
|
Member

Join Date: Dec 2008
Location: So. Orange County
Posts: 302
|
Bill, just do it with the PVC pipe and goop as mentioned. Mine has worked like a champ.
|
|
|
|
|
06-06-2010, 05:45 PM
|
#78 |
|
Olivenhain Bob
Join Date: May 2008
Location: Olivenhain, CA
Posts: 1,121
|
While I still have full confidence in the web mount system that was introduced at the start of this thread, I will be testing a new, (for me), option very soon.
Hummingbird has a "just for kayaks" mount kit that includes a small plastic frame that is shaped like their transducer. This gets mounted to the hull with adhesive provided in the kit. They also provide a "special" grease that you put in this reservoir and then set the transducer in the grease. It looks like a good system but I am concerned about the grease liquefying like the Vaseline does. I asked Humminbird about this and was told that it was a high temperature grease that will not liquefy. They are sending me a kit to test. I actually have one of these kits now that Dtownfan sent to me but do not have the grease so I have not been able to do the test. When I have tried this system out, I will post the results. I did a little research online and learned that there are many industrial greases, usually lithium-based that are very stable at high temperatures. My guess is that the "special" grease offered by Humminbird is one of those. If you have a grease mount that works except that your grease melts, you might want to try one of these high temp products. If it works, going the DIY way will be much cheaper than buying the H-bird system which costs somewhere around $25. That said, if you get everything is a kit that is designed to fit the transducer, it may be worth the investment. Stay tuned. Bob |
|
|
|
|
06-14-2010, 10:13 AM
|
#79 |
|
Rum Pirate

Join Date: Mar 2010
Location: Wilds of Mira Mesa
Posts: 388
|
So I finished the install of the wet mount on the new kayak and had to turn down the sensitivity on my 385ci from 18 to 2. I have found that if your max bottom setting in set to 450 the fish finder runs perfect. The default is 1000 on the 385ci.
I had problems when the max reading was set at 200ft. I figured this out because every time I went over the canyon in the reserve the FF stopped reading correctly. This wet mount ost me $14 for the pvc/rubber cap and $10 for the marine goop at OEX. I will never go back to glueing my FF directly to the hull. I need to now make a Battery box for the rear hatch on the pro angler. Bob you rock! Thanks for sharing this. Steve Last edited by sandydiego; 06-14-2010 at 10:25 AM. |
|
|
|
|
06-16-2010, 08:05 AM
|
#80 |
|
Rum Pirate
Join Date: Mar 2010
Location: Wilds of Mira Mesa
Posts: 388
|
Any one interested in splitting the cost for some 3M Scotch-Weld Structural Plastic Adhesive DP8005, 35 mL, a pack of tips and a applicator gun? It's $72 + tax at Grainger.
Last edited by sandydiego; 06-16-2010 at 08:24 AM. |
|
|
|
|
|
|


 Linear Mode

