|
|||||||
| Home | Forum | Online Store | Information | LJ Webcam | Gallery | Register | FAQ | Community | Calendar | Today's Posts | Search |
 |
|
|
Thread Tools | Display Modes |
 04-10-2009, 06:04 PM
|
#1 |
|
Member
Join Date: Feb 2009
Location: Carlsbad, CA
Posts: 48
|
Bait pump placement
I am using the large pet food container and next step is the plumbing. I have a '08 Tarpon 160i and have considered these 3 options: 1. Mounting a bilge pump on the intake hose and let it drag in the water over the side of the boat. (Least desirable) 2. Through hull mounting (Like Grego did) 3. Mounting pump in tank, pick up through scupper (Like the Hobie) 4. Making a bracket to mount pump on rudder mount on back of boat. I like the idea of mounting it through hull but hate the idea of drilling a hole in the bottom of my boat. I also liked the idea of mounting it on the rudder mounts, but have not seen that and wondered if it might be a problem since it is so far back and would be a hassle to get to in the event it plugs up. Let me hear your opinions on pros and cons because this is my first fishing kayak and I don't have one. Dave |

|

|
|
04-11-2009, 11:52 AM
|
#2 |
|
Senior Member

Join Date: May 2006
Posts: 260
|
You definitely don't want it on your rudder mount. If anything gets caught in it, or if the pump gets stuck in kelp, your screwed.
Hanging it over the side works. It's how the majority of the guys do it and it works very well. It works, its accessible.... Through the scupper is hard to do because you need a primer. You will also either need to prime it everytime the pump is turned off/on, or have a check valve. It's not a bad system if you get it to work out- it can definitely be done. Just a lot more work than I would want to deal with on my way to the grounds. I'm not sure what kayak you have, but the dog food container might even eliminate this as an option if it covers your scuppers. The cleanest and most efficient way is through the hull of your boat. If your uncomfortable doing the work yourself the guys at OEX are great and will do all of the internal drilling, plumbing and wiring so all you have to do is drop in your tank, push the hose onto the fitting and flip a switch. This way the pump creates no drag, can't get caught up on anything, and the pump is below the water line enough to stear clear of most surface clutter so you won't be sucking up debris. If your handy with a few tools and don't mind doing the work, it's pretty simple to do (i'm actually contemplating doing mine right now. You've motivated me. I'll have pictures up of the install in a few hours. |
|
|
|
|
04-11-2009, 01:25 PM
|
#3 |
|
Senior Member
Join Date: May 2006
Posts: 260
|
Actually, I've decided to actually go fishing tomorrow, and the install will need dry time. i'll do a full write up tomorrow.
|
|
|
|
|
04-11-2009, 02:53 PM
|
#4 |
|
Angler

Join Date: Jun 2008
Location: Long Beach, CA
Posts: 69
|
Was going through those same decisions a couple of months ago, decided to go with the bilge pump over the side. Didn't want to deal with priming the pump with the aerator. Notice a little drag, not too bad. Makes it easy to set up on my yak, as a self-contained unit.
     Used a Dog/Cat food container from Petsmart, rest of tubing/pump/goop from westmarine. Battery/switch/box from Orvac in Fullerton. Had most of the stuff already lying around, rest was around $60. |
|
|
|
|
04-11-2009, 05:19 PM
|
#5 |
|
Member
Join Date: Feb 2009
Location: Carlsbad, CA
Posts: 48
|
Nice set up BPcode3. Are you a Medic in Buena Park? I work for Riverside City.
Well after talking to Drew down at OEX Oceanside I decided to go with a through the scupper pump. Because of the way the well in the Tarpon is set up and using the pet food container it should set up just like the Hobie tank. I will take picture and post the build, along with other pictures of my boat as soon as I finish. Dave |
|
|
|
|
04-11-2009, 06:33 PM
|
#6 |
|
Senior Member

Join Date: Aug 2008
Location: Vista
Posts: 1,111
|
how many gallons can the pet food container hold? Looks like a cool set up for a fraction of the price.
|
|
|
|
|
04-11-2009, 07:49 PM
|
#7 | |
|
Member
Join Date: Feb 2009
Location: Carlsbad, CA
Posts: 48
|
Quote:
 Dave |
|
|
|
|
|
04-11-2009, 08:55 PM
|
#8 | |
|
Angler
Join Date: Jun 2008
Location: Long Beach, CA
Posts: 69
|
Quote:
 Thankful I'm even employed (x 2) Thankful I'm even employed (x 2)
|
|
|
|
|
|
04-12-2009, 07:12 AM
|
#9 |
|
Administrator

Join Date: Mar 2005
Location: 1-2 miles off the point
Posts: 6,943
|
Thru hull rocks! set it up with a 6 volt battery and go all day, super quiet
__________________
 
|
|
|
|
|
04-12-2009, 09:09 AM
|
#10 | |
|
Angler
Join Date: Jun 2008
Location: Long Beach, CA
Posts: 69
|
Quote:
|
|
|
|
|
|
04-12-2009, 12:41 PM
|
#11 |
|
Senior Member
Join Date: May 2006
Posts: 260
|
The thru hull design will work on any tank as long as the tank allows a place for the fitting to stick out. The only thing you have to be sure of is the pump being completely below the water line so it doesn't have to be primed.The idea is that all you have is a male hose fitting sticking out of your tank. That way all you do is set your tank into the tankwell, slide the hose onto the fitting and go. All the wiring and what not would be set up identical to the kayatank system. so that your battery is in a dry bag (dry box, whatever) inside the hull and you have a switch mounted on your deck. You could go all the way with it and set it up with a kayatank wiring harness and have the timer switch and everything which makes it super easy.
|
|
|
|
|
04-12-2009, 03:57 PM
|
#12 |
|
Angler
Join Date: Jun 2008
Location: Long Beach, CA
Posts: 69
|
Might have to head to Sunset to get some work done soon. Would be nice to get rid of the drag of the bilge over the side, Thanks
|
|
|
|
|
04-14-2009, 06:45 PM
|
#13 | |
|
Senior Member
Join Date: Mar 2005
Posts: 445
|
Quote:
One of the great things about this is that it is so easy to remove if you get something jammed in it (which I haven't since I got an awesome screen on the intake). These things are made to come a part to replace or take crap out of it, genius that Attwood mfg is!! The strainer I made is just plastic for a plastic lid or milk carton or something plastic....I can't frik'n remember. Used a 1.5" hole maker thingy and screwed it in with these thin small SS screws. You might want to put the on/off switch on the box itself or in the bag depending on whether it is accessible to you on the water. You only turn it on once and turn it off once, so it's no big deal. Unless you like to fook around with the bait and want to constantly play with the switch to make them jump  . I learned to keep it clean on the deck and less wiring running around in your hull to a switch that could rust or get knocked off. . I learned to keep it clean on the deck and less wiring running around in your hull to a switch that could rust or get knocked off.BpCode3 this was done on an X-13 http://bigwatersedge.com/bwevb/showt...ighlight=grego Last edited by Grego; 04-14-2009 at 07:05 PM. |
|
|
|
|
|
04-14-2009, 07:37 PM
|
#14 |
|
.......

Join Date: Jan 2009
Posts: 1,509
|
This is a repost but here's how I did mine, and it's been completely trouble free and exceptionally quite.
Here's the basic components.  That's a 2" inch rubber pipe cap from Home depot. A Rule 360 bilge pump, and a modified Marelon 3/4 thru-hull fitting. I modify all three. First I drill a 3/4 inch hole in the center of the cap and sand the end smooth on a belt sander. I then take the Marelon (glass fibered nylon) through hull...  chuck it in my lathe reduce the height of the exterior flange end sharpen its edge and then cut in an inset for the perforated aluminum screen. I then take it out of the lathe and tighten the nut down to the flange on top of a 1/4 inch spacer, I then cut the nut and shaft off with a bandsaw leaving only the 3/8 threaded washer end. What your seeing in the pic is the flange with 5/8 of it's shaft and threads underneath it with the screen in place and the threaded washer next to it. I use Marlon because it's strong, I would not try this with plastic versions or straight nylon. because they can break if you make them too thin. I go with rule pumps because the are the size I need and the 360 bilge is relatively cheap. About 12 bucks online. I also have had the plastic cases on several atwoods crack and leak. Rules have steel shafts that rust and eventually cause the pump to fail do to friction but they use better plastic then atwood that doesn't crack. Just a judgment call but personally I'd rather have a pump that overheats and dies due to a bad shaft eventually then one that cracks and fills my yak with water. I take the pump and heat the barbed nozzle outlet with a heat gun, until it's malleable then slide on a PVC shutoff valve from Home depot. Once it cools I cover the outlet barbs with 5200 to seal it and slide the valve back on the outlet, and lock it in place with a set screw. The shut off valve allows me to control the flow or shut off the flow from the pump completely if I get a leak below the water line in the PVC tank feed line.  I then drilled a 3/4 hole in the hull where it's in easy reach from my seat both inside and outside. Mount the flange on the outside coating the contact surfaces with 5200, slide the 2 inch cap on the shaft inside turned upside down, start the washer on the shaft and turn it down tight by rotating the cap.  To install the pump you just need to put it in the cap flange and tighten the hose clamp to seal the cap to the housing of the pump like tightening a radiator line.  The advantages are: it's easy and quick to remove and put back in but also that since there is not contact from the actual pump to the hull as it floats on a cushion of the rubber cap it's also very quite. Here's what it looks like on the outside under the hull.  The idea here with the flush screen is if it clogs I just reach down under the yak and wipe it clean with my hand. I do not use standard hoses or clamps but instead use PVC water purification and Ice maker line and the quick disconnects that they make for it. Once again you can just get this stuff from home depot. The advantage here is that I can easily remove the pump assembly without removing the line and since the components are nylon and stainless and since it's made for water purification systems and takes up to 60 PSI, there is usually no maintenance or leakage issues with the setup or for that matter clamps that you have to tighten to get a good seal. Just stick the tube in the fitting and your done. I use the same connection at the rear at the tank so I can easily take the tank in and out. It makes for a nice clean setup   I've now got maybe ten trips on this setup and have had no problems and have not made any changes to it. No airlocks no problems always fills right away... It's great to finally have a setup that always works. Bottom line: I'm doing all mine that way in the future. So there you have it.... Jim |
|
|
|
|
04-16-2009, 06:50 PM
|
#15 |
|
Member
Join Date: Feb 2009
Location: Carlsbad, CA
Posts: 48
|
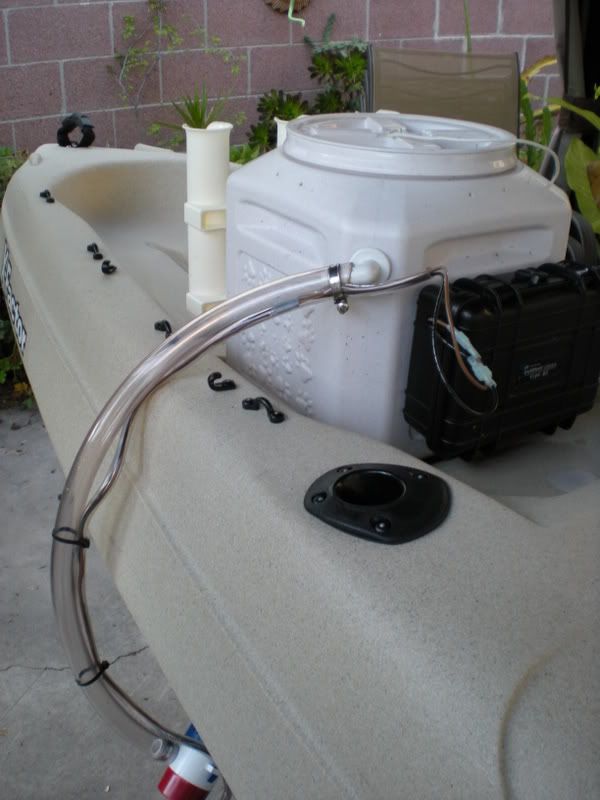
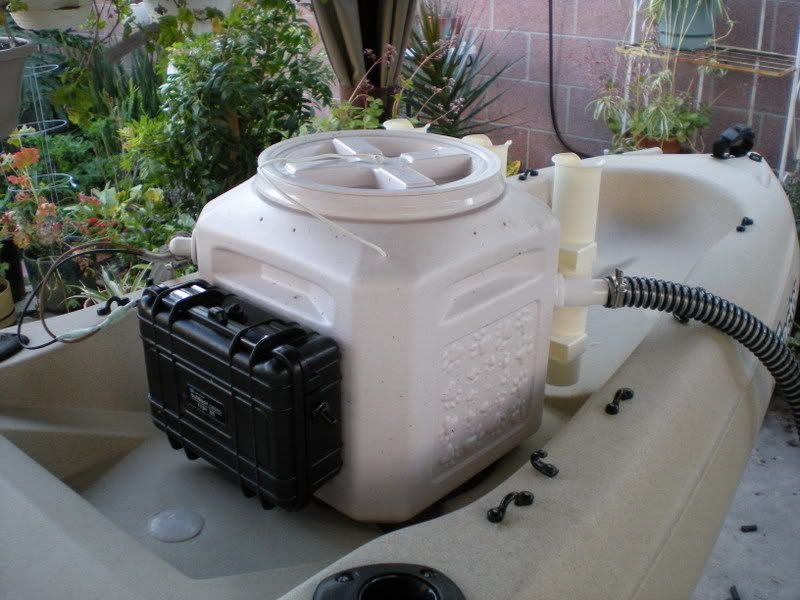
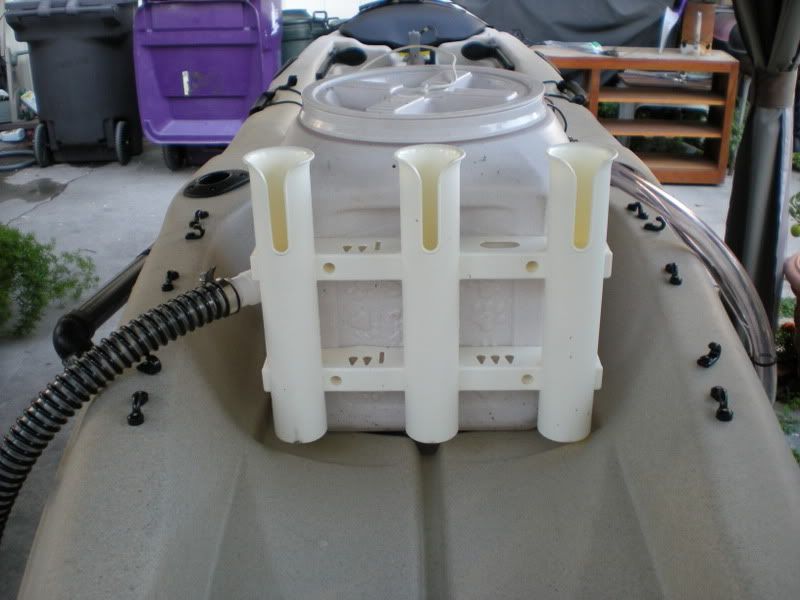
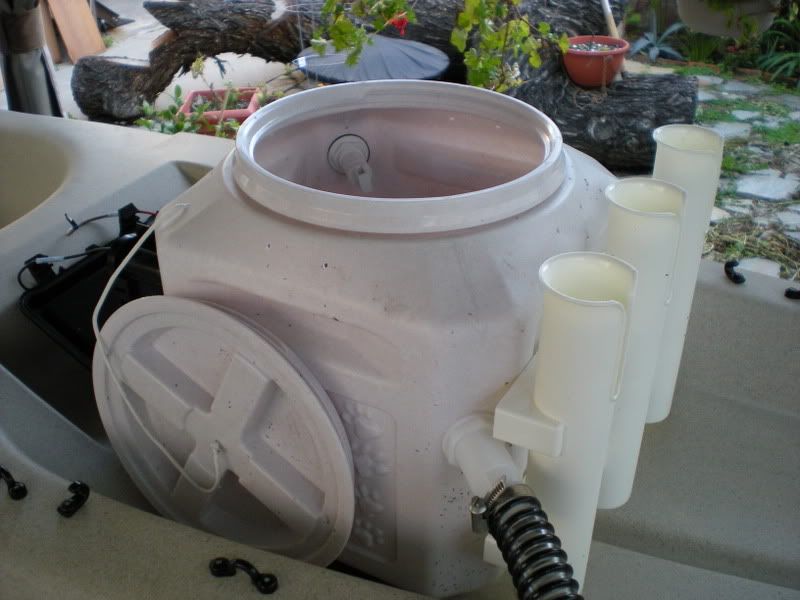
Ok, so I've started the tank build and I'm running my pump in the tank and through the scupper in the Tarpon. I went down to OEX and picked up a 3/4" check valve for the pump so it won't drain. Problem is with the valve screwed on to the pump and the tank is full it will not pump any water. I'm running a 6v battery and it works very nicely without the check valve but as soon as I put it back on the pump can no longer over come the check valve and the pressure from a full tank. Would I be better off running a 12v battery having the check valve in place?
Was going great till I tested it. HELP! |
|
|
|
|
04-27-2009, 04:42 PM
|
#16 |
|
Junior
Join Date: Apr 2009
Posts: 1
|
unscrew the check valve and take out the spring. the spring is to strong for your pump.
|
|
|
|
|
04-27-2009, 07:27 PM
|
#17 |
|
Senior Member
Join Date: May 2006
Posts: 260
|
bingo bango.
|
|
|
|
|
04-29-2009, 06:29 PM
|
#18 | |
|
Member
Join Date: Feb 2009
Location: Carlsbad, CA
Posts: 48
|
Quote:

|
|
|
|
|
|
04-29-2009, 10:23 PM
|
#19 |
|
Senior Member

Join Date: Jun 2008
Location: OC
Posts: 397
|
I am wondering why those of you who are using the large pet container don't just steal a page out of the Hobietank book and mount the pump inside the container? Seems easy enough and then no priming, no thru-hull and no hanging the pump over the side....Drilling a couple holes in a $40 tank to match your scupper dimensions seems more logical than drilling a hole in your $1K kayak??
|
|
|
|
|
04-30-2009, 04:05 PM
|
#20 | |
|
Member
Join Date: Feb 2009
Location: Carlsbad, CA
Posts: 48
|
Quote:
|
|
|
|
|
|
|
|


 Linear Mode

