|
|||||||
| Home | Forum | Online Store | Information | LJ Webcam | Gallery | Register | FAQ | Community | Calendar | Today's Posts | Search |
 |
|
|
Thread Tools | Display Modes |
|
|
 01-08-2018, 08:24 PM
|
#1 | |
|
Senior Member

Join Date: Nov 2010
Location: El Cajon
Posts: 512
|
Quote:
|
|

|

|
|
01-09-2018, 06:22 AM
|
#2 | |
|
Senior Member

Join Date: Feb 2015
Location: Seattle Area
Posts: 861
|
Quote:
I totally admire the quality of the DIY here, but damn at some point you just gotta go buy a boat, no? 
|
|
|
|
|
|
01-09-2018, 06:55 AM
|
#3 |
|
Senior Member

Join Date: May 2007
Location: Palos Verdes
Posts: 1,837
|
WOW...?
WOW...?
Really...on a Hobie hull...?!?!   
__________________
Jim / Saba Slayer 
|
|
|
|
|
01-09-2018, 08:35 AM
|
#4 |
|
Junior
Join Date: Sep 2013
Posts: 4
|
Response
Speed - 4 MPH with the standard prop. I just bought an improved three bladed prop that might increase it a little.
I work on Navy Weapon Systems but this is my first ever attempt at a composite project. I learned everything from the web. Thanks to Burt Rutan for wing structural ideas. Already own two boats on the east coast that haven't been in the water since 2006, so it was hard to justify another boat. My yard and garage here in SD does not support the size of boat I would want to have. |
|
|
|
|
09-19-2019, 02:10 PM
|
#5 |
|
Olivenhain Bob

Join Date: May 2008
Location: Olivenhain, CA
Posts: 1,121
|
Installing a fish finder with exterior transducer mount
When I first began fishing from a kayak in 2008, things were pretty simple. You paddled out, caught bait and trolled. There were plenty of fish in LJ back then so most fishing trips were usually fairly successful. Many of us did not even start out with a fish finder or bait tank. Things began to change quickly as Hobie’s pedal-powered yaks began to transform kayak fishing in a very good way.
Along with the propulsion transformation, the kayaks themselves began to evolve as well. The new designs provided places for bait tanks and fish finders, both game changers. Back in the day, most fish finders were simple sonar units. Sonar-only transducers have the ability to transmit through plastic so most were mounted inside the kayak hulls. Mounting methods included gluing the transducer to the hull as well as suspending the unit a water or grease reservoir. Each of these options worked pretty well. Fast forward about 10 years and we began seeing more advanced fish finders hit the market, some costing as much as the kayak to which they are attached. The new technology added down imaging and even side imaging capabilities. These advancements came at a cost, however. Down and side imaging signals do not penetrate plastic very well so if one wants to get the most of this new technology, the new transducers have to be mounted outside the kayak with an unobstructed view of the ocean below. The good news is that some of the newest kayak designs now have an exterior transducer mounting “pocket” molded into the hull. The bad news is that those of us with older boats now have to come up with a workaround. This post documents my solution. When I returned to kayak fishing this summer after a couple-year layoff, I discovered that some of my gear no longer worked. The fish finder did not survive my first day on the water a month or so ago so I went shopping for a replacement. I found a great deal on a Lowrance Hook 2 unit. Lowrance is offering rebates of $50 or $100 on most of their fish finder models right now. The offer expires October 31st 2019. I ended up with their 7X Splitshot model. The Splitshot version offers both sonar and down vision imaging along with GPS tracking. Other models add side vision imaging, and detailed maps. After rebate, my new fish finder set me back a very reasonable $180. Now to the next challenge, how and where to mount the transducer. My old boat does not have a suitable place to mount the transducer on the outside of the hull. I did a little research and discovered that both Ram and Scotty sell mounting arms that can be attached to tracks or balls which have been mounted to the kayak deck. I chose the Scotty 141 model for its adjustability and track-mount capability. The Scotty 141 includes their “Gear Head Adaptor” which allows accessories to be easily connected and disconnected from the transducer arm. I used this feature to create a mounting platform for my new fish finder. As anyone who has ever installed a fish finder on a kayak knows, these things come with very long wires that link the fish finder to the transducer. For internal mounts all that wire usually ends up being stowed somewhere inside the kayak. Given that my new fish finder rig would be mounted on the rail of my kayak and the fact that I transport and store my kayak upside down, resting on the rails, I needed to find a way to make the entire fish finder and transducer arm completely removable from the kayak so nothing was in the way while being transported or stored. The solution was remarkably simple. I just wrapped all the excess transducer wire around the transducer arm and zip tied everything in place. None of the transducer wiring enters or exits the hull. Up next was the fish finder mounting platform. I bought Scotty’s Universal Fish Finder adapter which attaches to the Gear Head connected to a narrow track that I mounted to the rail. The universal mount was not large enough to accommodate my 7” fish finder but a trip to Wal-Mart and about $2 provided me with a small plastic cutting board that I trimmed to a suitable size and attached to the top of the Scotty mount. 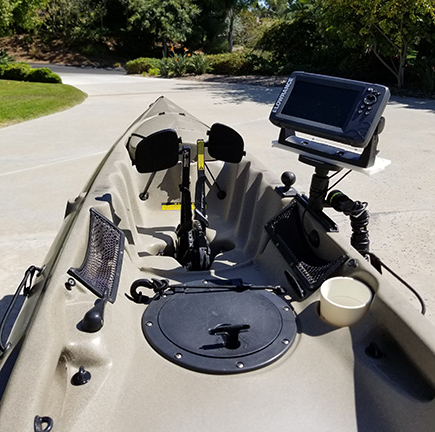 The final step was to figure out how to get power to my newly installed setup. Again this issue proved have a simple solution. I already had a battery storage area in the stern of my yak with wiring that ran the length of the hull. I was a little uncomfortable as I drilled a one inch hole into the side of my yak but West Marine’s Thru Bulkhead Wire Cap created a nearly waterproof wiring port. One nice feature of this wire cap is that while the fitting is close to being water tight, the power wire can be easily pushed in or pulled from the hull. This means that when I button things up for transport, most of the power wire can be pushed into the hull so nothing is left to flap around in the wind while driving at freeway speeds. 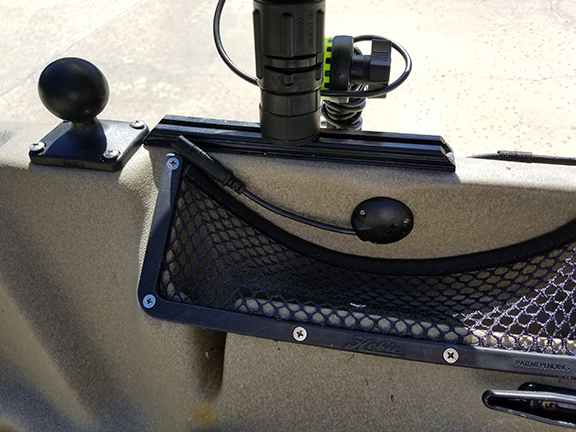 The maiden voyage with my new fish finder uncovered a few problems. The platform that the device was mounted on extended too far into the cockpit, interfering with my peddling and my 6 year old battery decided that it was time to throw in the towel. Both of these problems were quickly resolved. The next time out everything worked perfectly. Well almost everything. While the new fish finder displayed plenty of bait balls, the fish in those bait balls refused to attack my sabiki flies. I felt fortunate to catch four small Spanish. In the end, it did not matter because the bigger fish had taken the day off as well. The only fish we heard about that day were a couple of rock fish and small calicos. Maybe next time. 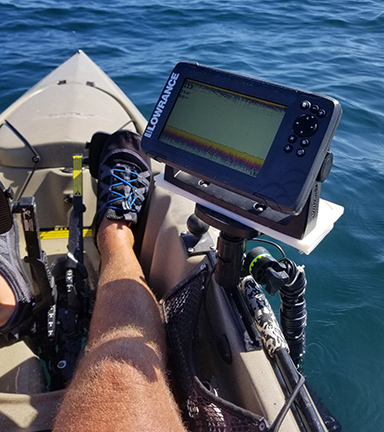 While I would love to upgrade to one of the latest and greatest kayak models that are designed to accommodate the modern fish finders and other things that yakfishers utilize, I will have to make do with what I have for the foreseeable future. Meanwhile, I look forward to having a new fish finder that has a screen twice the size of my previous unit along with the addition of down imaging. Now I just have to figure out how to use this great new tool. That should be fun. It might even improve my fishing. |
|
|
|
|
09-19-2019, 02:42 PM
|
#6 |
|
Member

Join Date: Aug 2013
Location: Pine Valley when not fishing La Jolla
Posts: 2,636
|
Great write up and installation, Bob. Looks great and should be awesome when the Yellows hook up, and you get to see them on the new FF screen. Thanks for sharing, it should help guys with their installation plans.
__________________
MARK ......... 2016 MALIBU X FACTOR, 2020 SOLO SKIFF (Fishing Kayak on Steroids  ) )  |
|
|
|
|
06-10-2020, 06:23 PM
|
#7 |
|
Junior
Join Date: Jun 2020
Posts: 2
|
Some mods made to my newly acquired 2013 outback
Needed a cutting board and saw someone post on this thread a similiar idea, hope you don’t mind my take on it🤙🏽 Cheers. Have more mods coming up too will be posting soon as I start to learn to use this forum. I’m in Newport Beach and new to kayaking but if anyone is in the area shoot me a dm and let’s exchange numbers and meet up. Thanks guys, this forum is rad, glad stumbled upon it🤙🏽
|
|
|
|
|
06-11-2020, 07:55 AM
|
#8 | ||
|
Senior Member

Join Date: Feb 2019
Location: Rancho Cucamonga
Posts: 608
|
Quote:
Quote:
__________________
IG: @blackflag_fishing Youtube: Blackflag Fishing 2014 Ocean Kayak T13 SOLD 2020 Hobie Outback SOLD 2021 Stealth Fisha 500 #StealthTribe |
||
|
|
|
|
06-11-2020, 11:38 AM
|
#9 | |
|
Junior
Join Date: Jun 2020
Posts: 2
|
Quote:
Tried to upload a picture and video but it’s not workIng |
|
|
|
|
|
07-25-2019, 08:14 AM
|
#10 | |
|
Junior
Join Date: Jul 2019
Posts: 9
|
Quote:
 . .They don't teach you these stuff in school. It is all math and science. The most hands on, practical people for these kinda of stuff are usually technicians, mechanics, machinists, etc... |
|
|
|
|
|
07-25-2019, 01:21 PM
|
#11 |
|
Manic for Life

Join Date: May 2015
Location: San Diego
Posts: 838
|
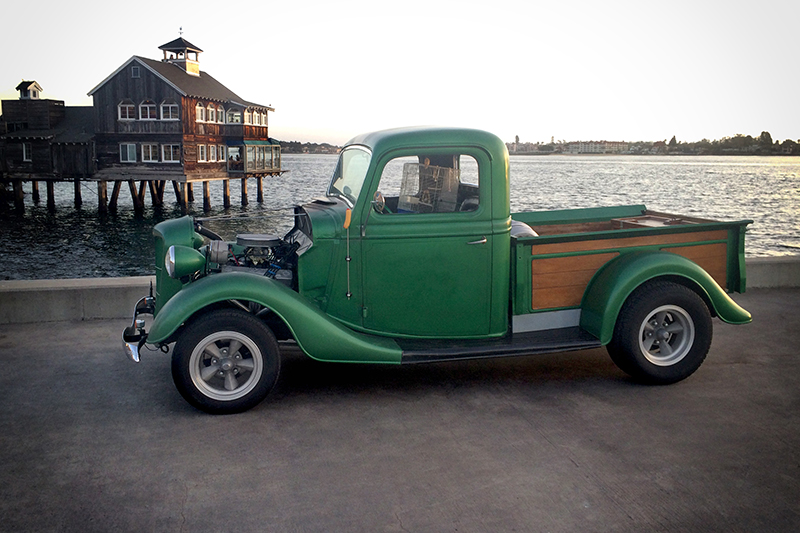
Can you show me how to make a single piece hood top (open on the sides) for my 36 Ford Pickup?
__________________
Another ho-hum day in Paradise |
|
|
|
|
07-25-2019, 04:10 PM
|
#12 | |
|
Senior Member
Join Date: Feb 2016
Location: San Diego, CA
Posts: 809
|
Quote:
Buy an English wheel and a shot bag and you can have one built in a jiffy. |
|
|
|
|
|
07-25-2019, 05:27 PM
|
#13 | |
|
Manic for Life
Join Date: May 2015
Location: San Diego
Posts: 838
|
Quote:
Tony Santana has an English Wheel at his Hot Rod Auto Body Shop at Santee High School. I took several semesters there looking for ideas, tools and techniques. Figuring out how to shape metal by hand with things like the English Wheel boggle my brain. I am in awe of people who can freehand materials into precise beautiful shapes.
__________________
Another ho-hum day in Paradise |
|
|
|
|
|
07-25-2019, 03:15 PM
|
#14 | |
|
Senior Member

Join Date: Apr 2011
Location: Menifee, CA
Posts: 1,460
|
Quote:
__________________
So long and thanks for all the fish... |
|
|
|
|
|
| Tags |
| kayak fishing inovations, kayak rigging ideas |
|
|


 Hybrid Mode
