|
|||||||
| Home | Forum | Online Store | Information | LJ Webcam | Gallery | Register | FAQ | Community | Calendar | Today's Posts | Search |
 |
|
|
Thread Tools | Display Modes |
 01-30-2010, 06:48 AM
|
#41 |
|
Olivenhain Bob

Join Date: May 2008
Location: Olivenhain, CA
Posts: 1,121
|
"In theory", you should get better performance with the wet mount. I am not aware of anyone actually doing before and after tests but it makes sense if you can get rid of the bubbles that commonly form in Goop installations, things should work better. As for how your existing transducer is currently mounted, if your transducer is glued in place with some clear silicon, it is probably a Goop installation. You can remove the transducer by carefully sliding a knife or other sharp tool under the unit until it eventually breaks away from the hull. You will then have to shave away all the Goop, eliminating any bubbles that may have formed. As for where the transducer should be mounted, I doubt that it makes much of a difference in a kayak but I prefer having it mounted near the bow so the fish finder will display what I am approaching rather than what I have already passed. If you have more questions about the wet transducer installation, visit this thread where it is discussed is more detail. http://www.bigwatersedge.com/bwevb/s...ead.php?t=6508 Bob |

|

|
|
02-04-2010, 09:46 PM
|
#42 |
|
Guerro Grande

Join Date: Jan 2006
Location: Houston, TX
Posts: 629
|
FF transducer wet mount
Bob's (DSAFETY) very slick transducer mount really got my attention: http://www.bigwatersedge.com/bwevb/s...ead.php?t=6508
Even though I had pretty good results with Gooped transducers, I've been thinking about doing a wet mount for quite some time. Seeing Bob's elegant and simple mount made me want to give it a try. As luck would have it, I had just recently purchased a Stealth 14 and it gave me a chance to try out a wet mount. There were only two problems: 1) I have a Lowrance FF and the transducer is absolutely ginourmous, 2) I don't have the engineering/fabrication skills of Bob. With these two handicaps I launched headlong into my project. I wish that Lowrance would make a smaller dual frequency transducer. The skimmer transducer that came with my Lowrance 527 FF/GPS is about the size and shape of an ironing board. It won't fit in a 3" PVC pipe. It won't even fit in the 4" ABS coupler that I ran out and bought before measuring the transducer. I had to use a little of my smarts and innovative thinking to come up with a solution. Unfortunately, I was a little short of smarts and innovation this week, so this is what I came up with. I figured that it would be really cool to be able to see the water in the transducer well. After all, you have to know how much water is in there and if it's turning green. My solution; Lexan. That's right; Lexan. Why use a box that you find in your parts bin when you can spend two days building the damn thing. Its a little bit on the clunky side. Not very elegant or clean looking, but it has transparent sides (until the algae turns it a murky green). Kinda looks like my old erector set that I had when I was 9. Like a vintage Soviet tank, this thing is ugly, but strong. Aluminum angle on the corners, plenty of Goop and bolts-bolts everywhere. It actually looks pretty badass in that photo. Kind of like the Enterprise in the space dock. Trust me; Scotty didn't build this monstrosity.....more like one of the dorks in the red shirt who gets whacked when he beams down to the planet surface. I couldn't trust this install to Goop. I used 3M 5200 to attach it to the hull (CJ recommended this). I roughed up the hull with coarse-grit sandpaper first, to get better adhesion. We'll see if it is still attached when I open it up in the morning. BTW: That is a fill plug on the forward end. I will be sealing the cable pass-through with a rubber bung and Gooping it into place.
__________________
Douglas Gaxiola  Team No Fish- Amateur Staff Team No Fish- Amateur Staff |
|
|
|
|
02-04-2010, 10:28 PM
|
#43 |
|
Junior
Join Date: Dec 2009
Posts: 17
|
pretty cool, but it looks like to much work.
I have the same wet mount transducer bob has works fine
yours is cool to, I like translucent container you used for your project. Allows you to if the transducer is paralell with the bottom of the hull. |
|
|
|
|
02-05-2010, 06:20 AM
|
#44 | |
|
Olivenhain Bob
Join Date: May 2008
Location: Olivenhain, CA
Posts: 1,121
|
Quote:
I like the idea of the well being clear so you can check the water level. The last time I went out, my Humminbird Matrix 12 started acting up. I ended up having to shimmy up to the bow, pull out my trusty Swiss Army Knife and pop the top off of my unit made of ABS to make sure that it was still full of water. (It was.) Having a well made of some clear material would have made that step unnecessary. I wonder if there is a source for clear plastic pipe in 3 or 4 inch diameters? A couple observations. It has been a while since I worked with Lexan but if memory serves, this material can be easily welded using acetone. Assuming the weld works, (you could goop the corners as well), that would eliminate the need for all the metal braces. Of course then the thing would not look as cool. Also, I like the portability that being able to detach the transducer from the well using a rubber cap provides. Does your design offer a way to do this? Finally, I do believe that the Lowrance transducer can be made to fit into a 4" piece of ABS pipe. The 3" one that works for Humminbird is too small. Cali Hookup and I collaborated on a version of my design to fit his Lowrance unit. We got it to work although it just barely fit. Nice work Doug. Bob |
|
|
|
|
|
02-05-2010, 07:00 AM
|
#45 |
|
Senior Member

Join Date: May 2006
Posts: 698
|
I use a factory wet mount from Garmin. It recommends using mineral oil in the well but I use fresh water and it works fine. I've considered putting saltwater in to see if I get better readings but never got around to it. I get good readings to about 700 ft. I remove the heavy transducer when transporting the yak upside down. This model allows you to install on a surface not level to the bottom and then adjust the transducer so that it is level.
Garmin - Garmin 200/50KHz, 12/45deg, Plastic, Adj. In-hull Mount Transducer 010-10327-00 Installed 2006, still no leaks.  I was sloppy with the 3M 5200, but the bottom of the well is clean so that it is only shooting through water and the yak's plastic. 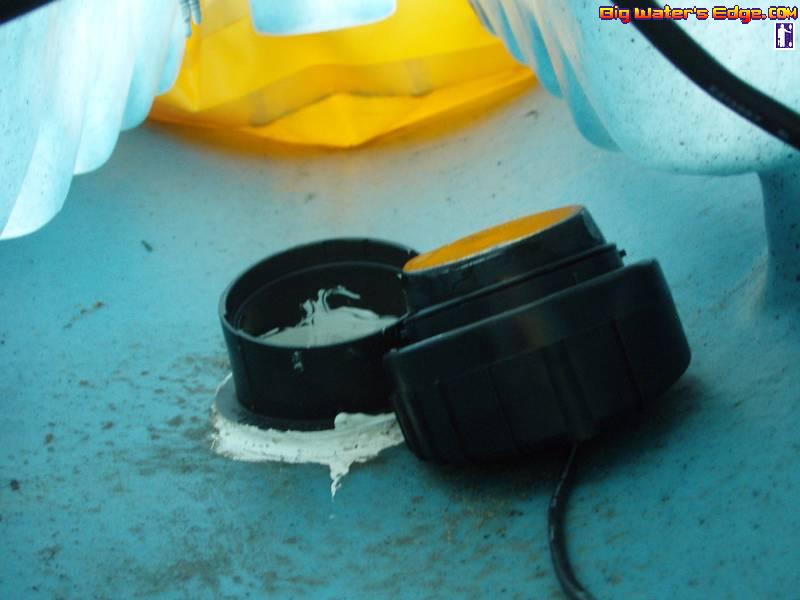
|
|
|
|
|
02-05-2010, 07:13 AM
|
#46 | |
|
Guerro Grande
Join Date: Jan 2006
Location: Houston, TX
Posts: 629
|
Quote:
Quickly detach the transducer......no. This baby is about as permanent as the top three floors of the Sunroad building in Kearny Mesa. If I have to move it I'm going to need a pry bar and some explosives. I think I might have been able to get the transducer in the 4" coupler if I had really tried. I gave up on it because I thought it would be too much work. Instead, I spent two days working on this. THINKING.....now there's my problem. I'm going to scrap this thing if it doesn't give me perfect performance the first time out. I'll just go back to the tried and true Goop. I would love to get one of those through-hull transducers, but all of the ones that work with my FF are ungodly expensive. If they didn't cost $800, I would just get a bronze thru-hull with a fairing.
__________________
Douglas Gaxiola Team No Fish- Amateur Staff |
|
|
|
|
|
02-05-2010, 07:14 AM
|
#47 |
|
Senior Member

Join Date: Jan 2009
Location: Rancho Cucamonga
Posts: 753
|
Fahq me, you guys need to quit coming up with this McGyver sheeeet. Now, I want to rip out my "NEW" wet mount trans (haven't even put mine in the water yet!) and install a transparent giz-mo out of plexiglass. All and all, way too cool of a set up.
BTW I have the same ginormous Lowrance transducer as you and it did fit well into the 4 in ABS adapter. I'll post some pic's of mine shortly. The only GOAT &^%$ about the 4in adapter vs the 3in adapter is the stiffness of the cap in 4in. I am concerned that after time, from checking the level of water and having to shimmy the cap off for inspection, the adapter seal may come loose from the hull.
__________________
GO ARMY BEAT NAVY! Bad decisions make great stories! 
|
|
|
|
|
02-05-2010, 07:49 AM
|
#48 | |
|
Olivenhain Bob
Join Date: May 2008
Location: Olivenhain, CA
Posts: 1,121
|
Quote:
Bob |
|
|
|
|
|
02-05-2010, 12:55 PM
|
#49 |
|
Junior
Join Date: Feb 2010
Location: Northern NJ
Posts: 1
|
Hello...first time post here. Was sent from another forum to check out this very post. Here is a great resource for all kinds of parts and I did find Clear pipe and fittings.
The PVC pipe is expensive but if you have enough people who wanted it maybe you could split it up... http://www.mcmaster.com/#plastic-pip...d-pipe/=5ouetf Just click the picture of the pipe to see the sizes available...1/4 - 6" Here is another one, but acrylic. This is cheaper... http://www.mcmaster.com/#acrylic-pipe/=5oukom |
|
|
|
|
02-05-2010, 01:10 PM
|
#50 |
|
Senior Member
Join Date: Jan 2009
Location: Rancho Cucamonga
Posts: 753
|
Okay, I think I uploaded my pic's correctly for the 4in wet transducer. My only regret in the overall install was the fact that the adapter is as large the Javelin Anti-Armour round and would not fit under the useless rear hatch. I think that would be the perfect spot for P2050051.JPGP2050052.JPGP2050053.JPGP2050055.JPG the transducer.
__________________
GO ARMY BEAT NAVY! Bad decisions make great stories!
Last edited by WahooUSMA; 02-05-2010 at 01:11 PM. Reason: screwed it up |
|
|
|
|
02-05-2010, 06:48 PM
|
#51 |
|
Guerro Grande
Join Date: Jan 2006
Location: Houston, TX
Posts: 629
|
Very nice. Now I see where I went wrong. The coupler I had was too long. If the MacGyver fish tank doesn't work I'll have a backup. Thanks
and...... Go Navy - Beat Army 
__________________
Douglas Gaxiola Team No Fish- Amateur Staff |
|
|
|
|
02-06-2010, 04:05 PM
|
#52 | |
|
Senior Member
Join Date: Jan 2009
Location: Rancho Cucamonga
Posts: 753
|
Quote:
__________________
GO ARMY BEAT NAVY! Bad decisions make great stories!
|
|
|
|
|
|
02-19-2010, 06:14 PM
|
#53 |
|
Olivenhain Bob
Join Date: May 2008
Location: Olivenhain, CA
Posts: 1,121
|
Rodholder Mod
About two years ago, I bought a Hobie Revolution and joined the yakfisher community. The Revo is a very well designed kayak but it is not without its flaws. One of the biggest issues I had with my boat from the beginning was the placement of the molded rod holders. They are too far to the stern to be very useful to me. My solution to this problem at the time was to build a “trolling bar” which gave me the ability to place two rods in a more accessible location and at an angle that is more suitable for trolling than the stock setup. You can see this device below.
002.jpg This trolling bar served me well until I picked up a Hobie Livewell a few months ago. While I could use the trolling bar with this bait tank, the supporting cross bar got in the way of the tank lid so it could not be opened all the way. I had wanted to update the trolling bar design for some time so this gave me the incentive to head to the shop and get to work. The goal was to design something that could be inserted into the molded rod holders and create a readily accessible, sturdy rod storage/trolling apparatus. The device would have to be easily installed and removed. The most important design objective was to move the rod holder positioning forward so that the rods could be easily reached without having to twist sideways while seated in the yak. A bonus goal was to make the angle of the rod holder adjustable from straight up for storage to about 60 degrees out for trolling. I think I nailed it! P1020528.jpg Below you will see the various pieces of PVC and ABS components prior to assembly. The total cost of the parts needed to build one of these is less than $10. P1020527.jpg Because my 2008 Revo has the rudder raising and lowering lever mounted on the starboard side next to the seat, I had to make two versions of this device which I call the inboard and outboard versions. The inboard design is well braced against the kayak so it may be a little sturdier. On the other hand this design takes up some space in the bait tank well, so on some narrow kayaks the outboard design may be a better choice. The newer Hobies no longer use a rudder lever so both versions will work on either side of the latest Hobie yaks. The photo below shows both versions installed with the rod holders in the trolling position. Inboard-outboard-trolling.jpg Assembly is easy. Start by cutting a piece of 1.25” PVC pipe just long enough to fit into the molded rod holder. Wrap this pipe with duct tape until the pipe fits snugly into the rod holder, (I use Gorilla Tape because it is very tough). Place a 1.25” to 1.5” slip adapter over the end of the pipe. (DO NOT GLUE ANYTHING YET!) Next fit a 1.5" sink trap assembly over the adapter. There are two versions of sink traps. One you glue together, the other has an integrated tightening collar that holds the two pieces together. Both will work for this project. I used the glue together version because it was cheaper. The next piece to go on is a 60 degree elbow. This will be attached to the sink trap on one end, and to a 1.5” slip/thread adapter on the other with short pieces of 1.5” ABS pipe. The length of these pieces of pipe will be determined by the type of kayak you have and where you want the rod holder to be. The longer these pieces are the further forward the rod holder will end up. After some experimenting, I found that the best place for the rod holder to be, for my usage, is an inch or two behind the back of the kayak seat. This is about a foot forward of the stock rod holder position but still far enough back so it will not interfere with paddling. One of the reasons for not gluing anything right away is that there are many adjustments you can make in terms of length and angles. If you want the rod holder to end up further forward that what I did, just use a longer piece of connecting pipe. If you want to always have your rod holder in the same angle position, you will not need to use the male and female threaded adapters that go on next. Just attach a 90 degree elbow to the 60 degree elbow from the last step. For the adjustable version, mate a male and female threaded adapter to the two elbows. Tighten these adapters so they are almost all the way in but still have enough travel to allow you to tighten or loosen in order to position the rod holder where you want it to be. Finally, cut a 10” to 12” piece of 1.5” ABS pipe and fit it in the 90 degree elbow. I cut the top at an angle to make it easier to insert the rod butt but this is optional. When all the pieces are attached together, insert the PVC pipe into the kayak’s rod holder. Twist and turn the various components until you are happy with the positioning of all the pieces. You want the device to fit easily into the molded rod holder and at some point near the other end, make contact with the kayak. This will be the anchor point where you will eventually strap the device to the kayak. Storage-Position-2.jpg My instructions may sound a little complicated but they will all make perfect sense when you have the pieces in your hands and start putting things together. When you are happy with the way everything fits, put some alignment marks on all the connecting pieces so you can reproduce the angles and connections. Double check everything again and then glue the pieces together. The last steps are done after all the pieces have been glued together. You will need to find a way strap the installed device to your kayak at the point that it touches the deck near the new rod holder end. I first used a Velcro strap that had been threaded through a nylon eyelet that I riveted to the kayak in a suitable place. This works but I am looking for a stronger strap that can be tightened more than the Velcro will allow. One of those ratchet buckles from a ski boot or snowboard binding would be perfect. When I find one, I will give this a try. You can also use a belt, a piece of rope or even a zip tie which would have to be cut off when you want to remove this device. The last step is to set the angles of the rod holder. With the unit installed, twist the rod holder end to a vertical position. Drill a small hole through both pieces of the threaded adapter and insert a pin in the hole to lock the rod holder in this position. Remove the pin; reposition the rod holder at the angle or angles that you would like to use for trolling and drill additional holes, using the first hole as a pilot hole. Make sure the pin fits in these positions and you are done. Although I designed this device to be used on a Revo, this design can easily be adapted to work on just about any kayak with molded rod holders located behind the seat. I have tested this setup on the water and it works great. I have much better access to my bait tank than with the trolling bar and can easily monitor the rod tips while trolling without having to twist and contort myself from side to side. I also gain two handy storage locations for rods or a gaff. After the maiden voyage, I added a couple of eyelets to each of these units to serve as attachment points for gear leashes. The first one of these things that I built took hours of trial and error. The second one took less than ten minutes to build. I think that this thing may be one of the most useful mods I have come up with so far. What do you think? Bob Last edited by dsafety; 02-20-2010 at 06:50 AM. |
|
|
|
|
02-27-2010, 04:35 PM
|
#54 | |
|
Member
Join Date: Jan 2010
Location: Northern Virginia
Posts: 50
|
Quote:
How did it work? I am working on the contour for my wet mount tonight. Did the contour of the bottom allow for a good reading with your unit? |
|
|
|
|
|
03-02-2010, 09:02 AM
|
#55 |
|
Senior Member

Join Date: Nov 2008
Location: Whittier
Posts: 126
|
FF Battery box
Heres something I recently put together to keep my battery box from sliding around.
I gooped some of that stuff you line your drawers with to the bottom of the box for grip.  After I figured out where I wanted the box to sit, I roughed up the bottom of 2 pad eye's and the inside of the hull. I gooped a pad eye on each side of where the box will be situated........Yes, gooped. It's actually quite strong.  I sized up a piece of 1/4" bungee cord and put a open hook on each end. I tried the other type of hook with the locking tab and they are damn near impossible to unhook.  Tadaaaa, it sits in there nice and tight.  
|
|
|
|
|
03-11-2010, 08:57 PM
|
#56 |
|
Senior Member

Join Date: Mar 2010
Location: San Diego
Posts: 2,385
|
I'm loving all these ideas. So far they have saved me a lot of money. I am making my own leashes for rods, paddle, and anything else that needs to be lashed to the Yak.
|
|
|
|
|
03-24-2010, 09:32 AM
|
#57 |
|
Rum Pirate

Join Date: Mar 2010
Location: Wilds of Mira Mesa
Posts: 388
|
Has anyone tried putting grease in the wet mount like they have for the hummingbird 385 kayak setup?
|
|
|
|
|
03-24-2010, 09:39 AM
|
#58 |
|
Senior Member
Join Date: Mar 2010
Location: San Diego
Posts: 2,385
|
not yet, but it makes sense
|
|
|
|
|
03-24-2010, 09:53 AM
|
#59 |
|
Olivenhain Bob
Join Date: May 2008
Location: Olivenhain, CA
Posts: 1,121
|
I have never played with the grease. I would have two concerns. Does the grease transmit as well as water? More importantly, does the grease flow when it gets warm?
I store my kayak upside down so if the well were partially filled with grease and flowed to the lid while in storage there could be some issues when the yak is flipped over if all the grease is stuck to the lid of the well. I suppose you could completely fill the well with grease but why do that if water works? Bob |
|
|
|
|
03-24-2010, 01:17 PM
|
#60 |
|
Member
Join Date: Jan 2010
Location: Northern Virginia
Posts: 50
|
never used grease.....i vote water. i made a version of bob's wet mount and love it. it has worked very well and you never will have to worry about the mess you could have. i have the 2010 570 hummingbird. i have been out on 3 full day trips and love my readings.
water = no bubbles......grease i am not sure about. plus++++++ water is free! |
|
|
|
|
| Tags |
| kayak fishing inovations, kayak rigging ideas |
|
|


 Linear Mode

