|
|||||||
| Home | Forum | Online Store | Information | LJ Webcam | Gallery | Register | FAQ | Community | Calendar | Today's Posts | Search |
 |
|
|
Thread Tools | Display Modes |
 01-11-2010, 11:16 AM
|
#21 |
|
Olivenhain Bob

Join Date: May 2008
Location: Olivenhain, CA
Posts: 1,121
|
That's a nice setup. Did the adjustable tracks come on your kayak or did you add them? Where does your bait tank go when using these rod holders? It would be nice if the two outside tubes could be angled out a bit for wider separation when tolling. Is this possible? Bob |

|

|
|
01-11-2010, 04:57 PM
|
#22 |
|
Administrator

Join Date: Mar 2005
Location: 1-2 miles off the point
Posts: 6,943
|
Bob,
The tracks are built into the new Tarpons, the SlideTrax system. I came across somebody using these off road handlebar hardware to make an accessory bar up front. The bar can be moved along the length of the track to accommodate the bait tank in front. The rail mount rod holders can be adjusted to point out as well.
__________________
 
|
|
|
|
|
01-17-2010, 06:25 PM
|
#23 |
|
Olivenhain Bob
Join Date: May 2008
Location: Olivenhain, CA
Posts: 1,121
|
By popular demand, this device which was introduced in another post is being added to this thread.
Enjoy Bob Permanent Wet Transducer Installation Today's project was to come up with a way to permanently install a new Fish Finder Transducer using the wet method. I would like to take credit for this idea but truth be told, I found a post from a guy in Australia who came up with this idea a year or two ago. I have modified the original installation a bit. You will need a 3" piece of drain pipe or a 3" adapter, some sort of cap that will screw or clamp to the top of the adapter, some goop, a few stainless screws and a fish finder with transducer. I used a rubber cap a threaded 3" adapter. You could also use a threaded cap but I thought the rubber cap would provide a better water seal. The first step is to attach the "well" to the hull of the kayak. I shaved the bottom of the adapter a bit to make it fit the contour of the hull and gooped it to the plastic making sure there would be no leaks once the well was filled with water. Next came mounting the transducer to the cap. I sliced an X in the rubber that would expand large enough to allow the transducer plug to fit through. You could also drill a hole but that would mean a larger waterproof patch later. In the middle of the X I drilled a hole large enough for the cable to slide through without distorting the rubber. Using the transom mount that came with the transducer, I attached the transducer to the inside of the cap making sure that everything would fit inside the well when the cap was installed. I marked the top of the cap to show the direction the front of the transducer was pointing and gooped the area where the cable passed through to make it water tight. After the goop cured, I filled the well with water, slid the cap with transducer over the top and tightened the hose clamp. The completed installation is below. If all goes according to plan, I should be able to fill the well with water once and forget about it. No more constantly checking the foam ring to make sure the water has not spilled, dried up or drained away. Since I store and transport my kayak upside down It is very important that this thing does not leak. We will see. I have not yet tested this installation on the water but hope to go to La Jolla on New Years Day. If you see me out there, please feel free to paddle on over and check this installation out. I have a couple concerns beyond whether this thing will remain water tight. Will the fact that there is about an inch of water between the transducer and the hull have any effect? Since the temperature sensor is inside the well, it will probably not give a very accurate reading. The water in the well will have to stabilize with the ocean water. That could take some time. It will almost certainly not be able to detect subtle changes in the water temperature as I peddle from one place to another. All things considered, this is not a very big deal. See you out there. Bob UPDATE: I have tested this setup a couple times and it works perfectly. It has been stored upsided down for a couple weeks now and no leaks have appeared. The issue with the temperature not responding immediately is real. It typically takes about a half hour for the reading to stabilize with the ocean water. As for performance, the fish finder works perfectly, much better than my previous installation although I am sure that part of the improvement is due to the fact that my new FF has better resolution than the old one. Last edited by dsafety; 01-18-2010 at 06:07 AM. |
|
|
|
|
01-17-2010, 09:32 PM
|
#24 |
|
Senior Member

Join Date: Jul 2007
Location: Waiting to launch
Posts: 1,381
|
drop shot loop
When I use a drop-shot rig in the bay I like to use a two oz. torpedo sinker. I used to take it off of the snap swivel every time a location change was called for. It would be removed to prevent it from swinging and damaging the rod or getting tangled with other rods. Now I use a washer from a garden hose that is zip tied to the threaded area of the reelseat. The sinker slides in and out very easy and the washer is not in the way
A drinking water bottle with a loop on it and a wide mouth make a great holder for keyes and a cellphone. Put the loop through one of your seat straps and it will be withen easy reach. The water bottle can be used to rinse sand off of your yak when you come in. Last, put your kayak dolly on the trunk of your and secure it down with the wheels up so that you can roll your yak up to the roof racks rather than lifting it. |
|
|
|
|
01-18-2010, 05:59 AM
|
#25 | |
|
Olivenhain Bob
Join Date: May 2008
Location: Olivenhain, CA
Posts: 1,121
|
Quote:
Bob |
|
|
|
|
|
01-20-2010, 02:33 PM
|
#26 |
|
Paddle, Fish, Repeat
Join Date: Jan 2010
Location: Salt Lake City, UT
Posts: 26
|
Downrigger crate
Not sure if this is an innovation, but my take on adding a downrigger to a crate. I already had a downrigger from my fishing boat (which is used less and less). I didn't want a permanent installation until I see how much I actually use it. I had some leftover cutting boards which bolted on either side of the crate with mounting base on the outside. I was lucky enough to find a crate with a metal ring around the top, so it pretty strong.
downrigger1.jpg downrigger2.jpg Next I needed a way to lock the crate down. I used some U-bolts and pvc and have go into the rod holders behind the seat. They are angled in and do a nice job keeping it down. The one end is not glued shut so I can take it off when I want to. downrigger3.jpg downrigger4.jpg I really enjoy seeing all the different ideas on this forum. Thanks.
__________________
 Paddle, Fish, Repeat. |
|
|
|
|
01-20-2010, 03:44 PM
|
#27 |
|
Senior Member
Join Date: Mar 2009
Posts: 2,384
|
I would love to hear how the downrigger affects the handling of your yak. I was considering the same thing for trout fishing up in Idaho, and was concerned about the drag. Do you peddle or paddle?
|
|
|
|
|
01-20-2010, 04:05 PM
|
#28 |
|
Senior Member

Join Date: Mar 2005
Location: "The Table"
Posts: 976
|
Andy- That is SICK

|
|
|
|
|
01-21-2010, 02:56 AM
|
#29 | |
|
Paddle, Fish, Repeat
Join Date: Jan 2010
Location: Salt Lake City, UT
Posts: 26
|
Quote:
__________________
Paddle, Fish, Repeat. |
|
|
|
|
|
01-21-2010, 07:41 AM
|
#30 |
|
Fringe Head

Join Date: Mar 2005
Location: Drippin Chicken Water Ranch
Posts: 140
|
In Hatch Gear Holder
Simple solution to keep gear in the bow from sliding around. Goop, padeyes and bungee. Held up for over a year.
|
|
|
|
|
01-21-2010, 08:36 AM
|
#31 |
|
Junior
Join Date: Nov 2009
Posts: 22
|
Hey senojmj, what size pvc did you use to put inside the flush mount?
|
|
|
|
|
01-21-2010, 08:58 AM
|
#32 |
|
Administrator
Join Date: Mar 2005
Location: 1-2 miles off the point
Posts: 6,943
|
Ed, that is some Amazing Goop!
BTW made this post a sticky too much good stuff, Thanks Bob for lighting the fire!
__________________
|
|
|
|
|
01-21-2010, 10:55 AM
|
#33 |
|
Senior Member

Join Date: Aug 2008
Location: Long Beach
Posts: 427
|
Power Button for Bait Tank
Ever had the problem of rusted out on/off switches due to the salt water? I would like the credit for this but it was not my innovation, but works like a charm!
Using an air button and an air switch like they use in spas, I installed the air switch inside the battery box that powers my bait tank and the button on deck at an easy reach. The way this works is the button sends a pulse down the tube to the switch and triggers the power. No worries about salt water corroding this plastic button! Looks neat too! Two years later, still working like new! Last edited by wiseguy; 01-21-2010 at 02:59 PM. |
|
|
|
|
01-21-2010, 04:16 PM
|
#34 | |
|
Paddle, Fish, Repeat
Join Date: Jan 2010
Location: Salt Lake City, UT
Posts: 26
|
Quote:
__________________
Paddle, Fish, Repeat. |
|
|
|
|
|
01-25-2010, 04:13 PM
|
#35 |
|
Administrator
Join Date: Mar 2005
Location: 1-2 miles off the point
Posts: 6,943
|
water pick up thru tank scupper. This is a similar variation of the Hobie tank set up.
cut down a 90 male 1" thread to 3/4 hose elbow so it fits in the channel flush, the screw splits the opening in half to keep debri out. 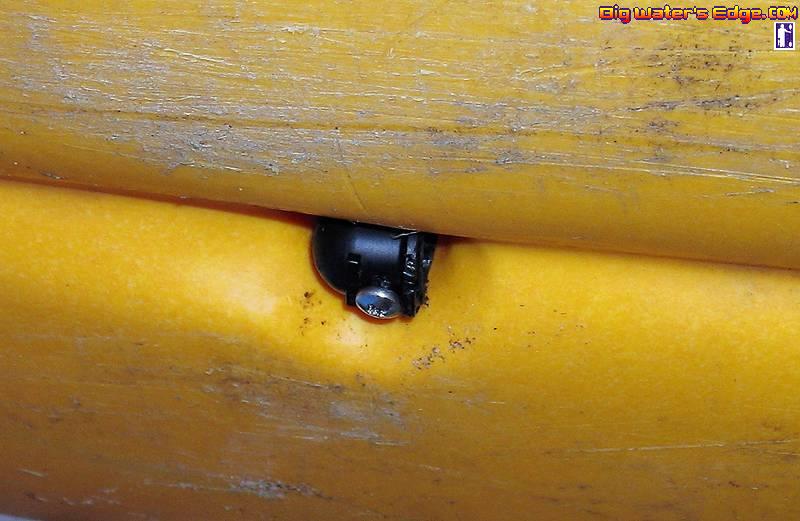 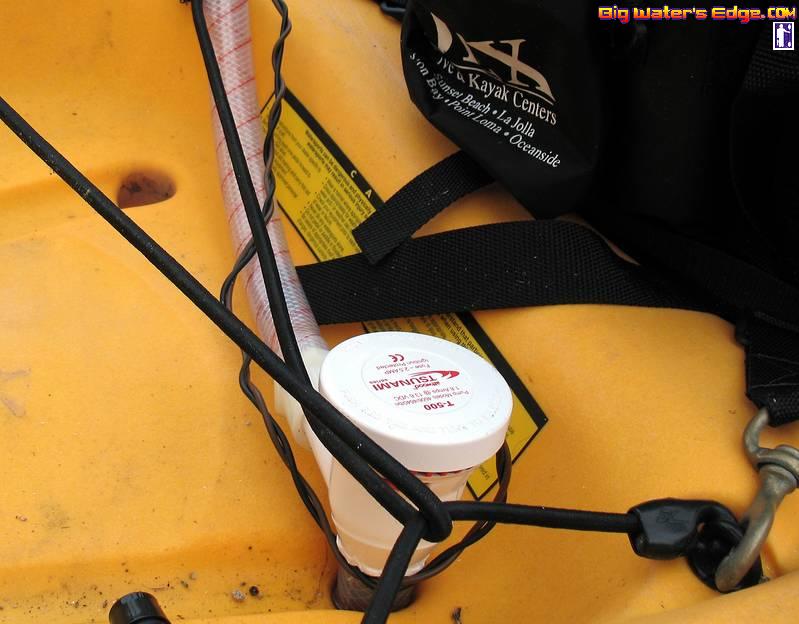 Easily changed out to most kayaks.....skanky after rain bay water ") 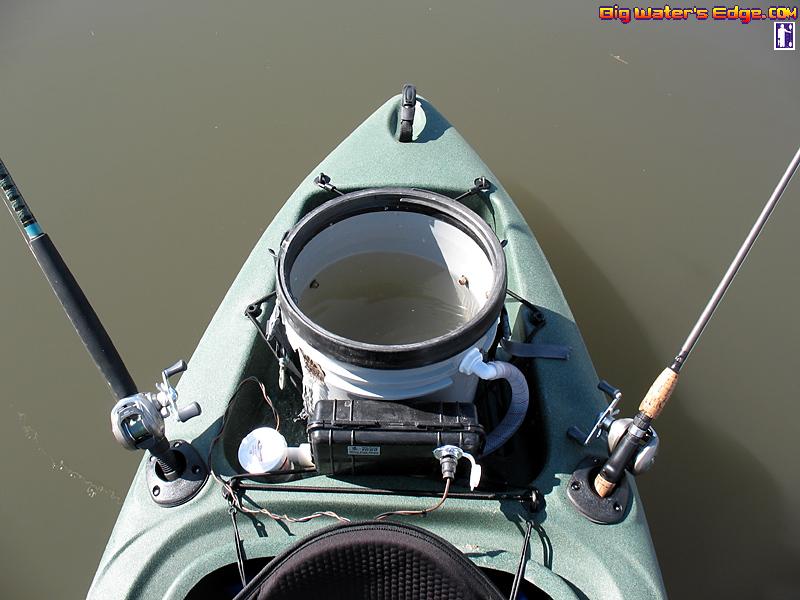 Simple way of getting that thru hull set up with out drilling those big holes. A little forward momentum is all it takes to prime/ 6 volt kept prime and worked well.
__________________
|
|
|
|
|
01-27-2010, 11:14 AM
|
#36 |
|
Olivenhain Bob
Join Date: May 2008
Location: Olivenhain, CA
Posts: 1,121
|
If you have a Hobie Livewell or any other bait tank fed from the bottom of the tank through a scupper hole, you have probably run into the problem of your bait tank draining when you turn the pump off, (or your battery dies). Here is a simple solution that problem.
You will need a quick disconnect fitting, (female hose thread to male pipe thread), a female to male threaded El fitting and a short piece of plastic hose. I used the quick disconnect fitting because I had one laying around but you could probably make this using all threaded fittings and even a solid piece of PVC pipe. P1020502.jpg Assemble the parts as shown in the photo above and attach the quick disconnect fitting to the output of the pump and you are done. P1020503.jpg If you want to make the water in the tank circulate to simulate a current for your bait to swim against, position the hose on the bottom of the tank. If you want to keep the tank from draining when the pump is turned off, twist the fitting so the hose points vertically. When in this position, the water in the tank will not drain below the top of the input or drain pipe, (whichever is lower). Have fun. Bob Last edited by dsafety; 01-27-2010 at 12:14 PM. |
|
|
|
|
01-27-2010, 11:59 AM
|
#37 |
|
Senior Member

Join Date: Jun 2009
Posts: 108
|
question
I have a question about running a FF and bait tank from the same 12V battery for you innovators... Can I just switch the wiring of the bilge pump without affecting the FF?
Or.... has anybody used the computer fan speed control with success? |
|
|
|
|
01-27-2010, 12:05 PM
|
#38 | |
|
Olivenhain Bob
Join Date: May 2008
Location: Olivenhain, CA
Posts: 1,121
|
Quote:
You could probably put some sort of a rheostat in line to the pump motor to reduce the voltage but I have never tried that solution. Bob |
|
|
|
|
|
01-29-2010, 06:43 PM
|
#39 |
|
Junior
Join Date: Mar 2008
Posts: 22
|
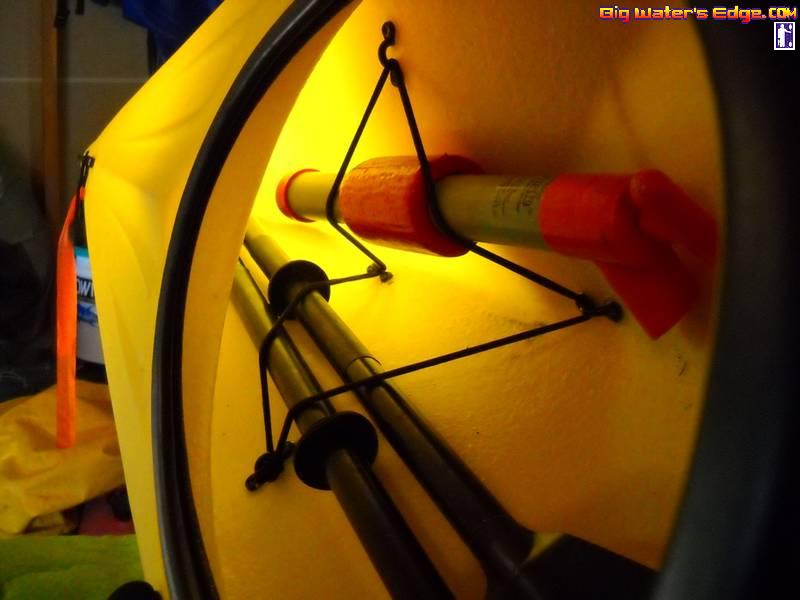
With the 12 volt battery , the run time will be shorter than with a 6 volt
Here's a stand up bar mounted on the Trax rail Last edited by SteveK; 01-29-2010 at 07:01 PM. |
|
|
|
|
01-30-2010, 05:41 AM
|
#40 |
|
Paddle, Fish, Repeat
Join Date: Jan 2010
Location: Salt Lake City, UT
Posts: 26
|
Question on wet installation of transducer
dsafety,
my being a novice to the sport is going to show here. I bought my kayak with the transducer already installed on the inside of the hull. If I were to switch to a wet installation like you did, in theory I could obtain a better reading? The water is permanently sealed in with the transducer? Not sure what my transducer was glued down with. I have heard the bubbles in the adhesive could interfere with readings. Another novice (read: dumb) question: Does it matter where inside the kayak it is mounted? Currently it is just under the seat behind a scupper hole on the starboard side. Any advice is greatly appreciated. Jeff
__________________
Paddle, Fish, Repeat. |
|
|
|
|
| Tags |
| kayak fishing inovations, kayak rigging ideas |
|
|


 Linear Mode

