|
|||||||
| Home | Forum | Online Store | Information | LJ Webcam | Gallery | Register | FAQ | Community | Calendar | Today's Posts | Search |
 |
|
|
Thread Tools | Display Modes |
|
|
 06-06-2011, 07:55 AM
|
#1 |
|
Heroes on the Water Staff

Join Date: Mar 2011
Location: Anahiem
Posts: 176
|
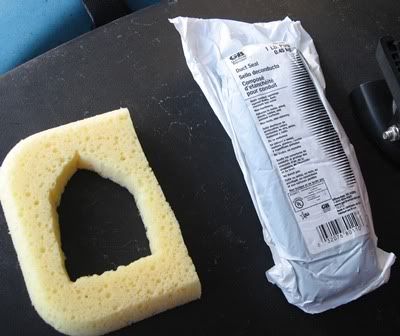
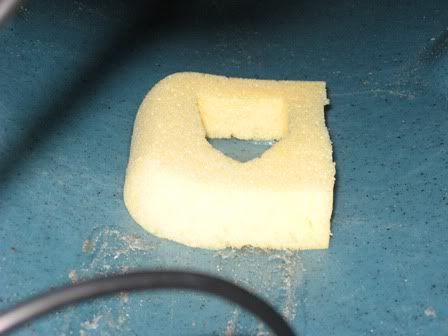
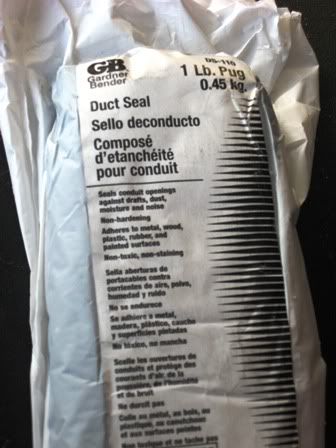
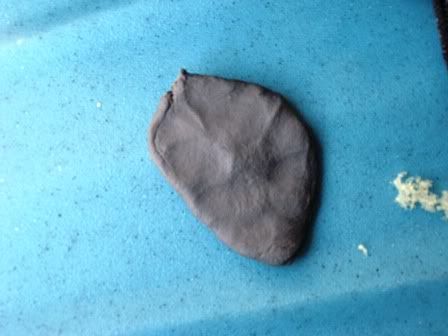
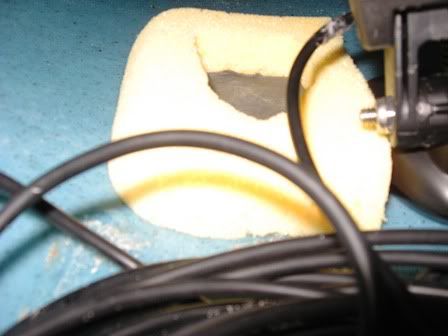
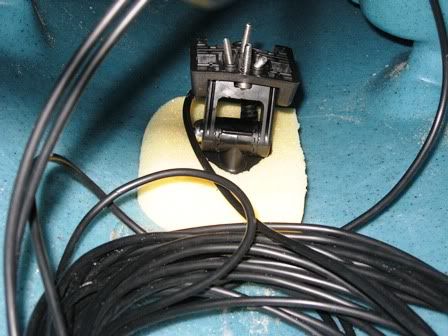
I am suprised that putty works. It is mostly clay and some have fiberglass or other stuff mixed in to keep it strong. I used it a lot in Vaccuum sealing applications. Also I would not expect the putty to release air bubbles, which could be a problem.
I am kind of confused after looking at your picture though... It seemed like your Fish Finder screen was all clutered? Is that right? Mine is perfectly clear except where I would expect to see noise or Hopefully marks... Good Luck |

|

|
|
06-06-2011, 08:23 AM
|
#2 | |
|
Senior Member

Join Date: Mar 2010
Location: San Diego
Posts: 2,385
|
Quote:
I was a doubtful about the putty myself but I thought well for a $1.29 it can't hurt and if it doesn't work, I'll just Goop it down when I get home. After seeing the results from yesterday, I am very happy with it.
__________________
No better time than being on the water, God Bless, JimmyZ 
|
|
|
|
|
|
06-06-2011, 08:23 AM
|
#3 | |
|
Senior Member

Join Date: Mar 2009
Location: Menifee
Posts: 2,509
|
Quote:
|
|
|
|
|
|
06-06-2011, 04:42 PM
|
#4 |
|
Member
Join Date: May 2011
Location: Orange Ca
Posts: 60
|
Question for you guys who made your own live well;
What speed bilge pump are you using? I'm debating between a 500gph and a 360gph pump. The 500 seems like it blasts a lot of water, maybe too much. Any input would be appreciated. Thanks, Randy |
|
|
|
|
06-06-2011, 05:08 PM
|
#5 |
|
Senior Member
Join Date: Mar 2010
Location: San Diego
Posts: 2,385
|
I use the 360 and it works great.
__________________
No better time than being on the water, God Bless, JimmyZ
|
|
|
|
|
06-06-2011, 07:08 PM
|
#6 | |
|
Olivenhain Bob

Join Date: May 2008
Location: Olivenhain, CA
Posts: 1,121
|
Quote:
I have been using this technique for nearly a year now with no problems. Bob |
|
|
|
|
|
06-20-2012, 02:33 PM
|
#7 | |
|
Senior Member
Join Date: Mar 2010
Location: San Diego
Posts: 2,385
|
Quote:
__________________
No better time than being on the water, God Bless, JimmyZ
|
|
|
|
|
|
12-06-2011, 07:16 AM
|
#8 |
|
Senior Member
Join Date: Nov 2011
Location: Escondido CA
Posts: 114
|
free game clip
IMG_0823.jpgdon't know how good it will be, but just messing around and made one out of sturdy wire coat hangar (the type that have a coating). It is simply bent into loop, hooks on each side, wrapped top loop with electrical tape. It seems strong enough and when weight is on it, the hooks hold firm. Of course you can get a real one for $18.95.
Last edited by james92026; 12-07-2011 at 04:51 PM. |
|
|
|
|
02-14-2012, 03:21 PM
|
#9 |
|
Senior Member

Join Date: Apr 2010
Posts: 6,855
|
Hobie Deep Trays
I was interested in purchasing one of those new Hobie deep trays for my Outback but I was getting nothing but bad reviews from those that already had them. Most if not all of the guys that I talked to stated that if to much weight was added or if it was a hot day the tray would give and fall through into the kayak, I decided to buy it anyway and see what I could do to keep it from falling through. After figuring out why the tray would fall through I came up with a little idea.
Step 1 cut a piece of 3/4" PVC to size  Step 2 Goop the hell out of it  It works great!! I had roughly 3 lbs of lead, my digital scale, digital camera, cell phone and a few other small items in the tray and it never fell through.
__________________
 www.facebook.com/Teamsewer Last edited by jorluivil; 02-16-2012 at 12:43 AM. |
|
|
|
|
02-14-2012, 05:43 PM
|
#10 |
|
Member

Join Date: Sep 2010
Location: HB
Posts: 78
|
Step 2
Goop the hell out of it It works great!! I had roughly 3 lbs of lead, my digital scale, digital camera, cell phone and a few other small items in the tray and it never fell through.[/QUOTE] Good idea George!!! I purchased one on Sat, took it out Hooping on Sunday and it already has cracks in the same places were you added the reinfocement... I am convinced that goop is the new duct tape... I wonder what McGguyver would have done with a little goop and PVC? 
|
|
|
|
|
02-14-2012, 06:10 PM
|
#11 |
|
Olivenhain Bob
Join Date: May 2008
Location: Olivenhain, CA
Posts: 1,121
|
For me, the biggest problem with the Hobie hatch system is that there is usually water that settles in the seams around the hatch. When I open the hatch, all that water falls on my previously dry stuff.
Has anyone come up with a solution to this problem, (other than the obvious towel option.) Bob |
|
|
|
|
02-16-2012, 12:41 AM
|
#12 | |
|
Senior Member
Join Date: Apr 2010
Posts: 6,855
|
Quote:
__________________
www.facebook.com/Teamsewer |
|
|
|
|
|
08-18-2012, 07:23 PM
|
#13 |
|
Senior Member

Join Date: Jul 2012
Location: All over the country
Posts: 109
|
a couple 12 Malibu X Factor mods
Here are a few mods i did to an X Factor. Bait tank with a t-500 pump. Adjustable FF on a yakattack track with ram mounted for head unit. I can slide and lock into place any where along the track. Transducer through hull set up with duct seal putty couplant. Foot trough lined with comfortable rubber matting material.
  
|
|
|
|
|
08-18-2012, 08:27 PM
|
#14 | |
|
Senior Member

Join Date: Apr 2012
Location: Carlsbad Ca.
Posts: 1,206
|
Quote:

|
|
|
|
|
|
08-19-2012, 01:07 PM
|
#15 |
|
Senior Member

Join Date: Sep 2011
Posts: 598
|
for all your GoPro guys.
|
|
|
|
|
08-29-2012, 09:46 AM
|
#16 |
|
Senior Member

Join Date: Apr 2011
Location: Menifee, CA
Posts: 1,460
|
Rod butt holder
Lacking the upper body strength to just yank a fish out of the water, I have been thinking of some small, inexpensive way to use a rod butt holder while tugging on the larger variety. Here is what I found, 1 1/4 inch tee, just thread your belt through the tee section. I ahve tried it and it seems to work, and it is comfortable and out of the way most of the time.
__________________
So long and thanks for all the fish... |
|
|
|
|
08-29-2012, 10:25 AM
|
#17 | |
|
Senior Member

Join Date: Mar 2012
Location: San Bernardino, CA
Posts: 913
|
Quote:
__________________
Remember There are Many Fish in the Sea MEANS MORE TO EAT!!! |
|
|
|
|
|
08-29-2012, 10:42 AM
|
#18 | |
|
Team Keine Zugehörigkeit

Join Date: Nov 2010
Location: Way out there
Posts: 2,854
|
Quote:

__________________
 Não alimente os trolls------------Don't feed the trolls---------------インタネット荒らしを無視しろ 
|
|
|
|
|
|
09-17-2012, 06:45 PM
|
#19 |
|
Senior Member

Join Date: Sep 2010
Location: South OC
Posts: 1,605
|
From this to that. . .
I had a wild hair and picked up a used outback on the forum. Now I have two kayaks (i will eventually sell one of them).
for about 1 week I had them side by side in the garage. Hard to do anything in the garage since they were in the way. Making things worse I really couldn't access them easily. I needed a storage solution. I Poked around on line and liked the idea of hanging the yaks on the wall on their sides. My pops was in town (a very clever man). We discussed and then off to Home Depot. I bought 2 X 10 ft sections of 3/4 inch steel pipe, 8 bolts @ 1/4 x 2 1/2 s & borrowed a pipe bender. I Cut the pipe into 4 x 5ft sections and did this. - hammer flat one side of the pipe about from the end to 6 inches down. - Drilled two 1/4 inch holes in the newly flattened ends - Bent away. Used a metal wired hanger as my template - Bolted the bent pipe/racks on the wall. - Hung kayaks. What I still need to do is trim-down (shorten) the racks. I trimmed about 8 inches from the bottom hangers. That makes mounting and un-mounting way easier. All said a very in expensive fix to storage. |
|
|
|
|
09-17-2012, 06:50 PM
|
#20 |
|
Senior Member

Join Date: Sep 2009
Location: newbury park ca
Posts: 2,323
|
damn it, now I don't have an excuse for getting that other kayak...looks great, thanks for sharin'....
__________________
|
|
|
|
|
| Tags |
| kayak fishing inovations, kayak rigging ideas |
|
|


 Hybrid Mode
