|
|||||||
| Home | Forum | Online Store | Information | LJ Webcam | Gallery | Register | FAQ | Community | Calendar | Today's Posts | Search |
 |
|
|
Thread Tools | Display Modes |
|
|
 01-27-2010, 11:59 AM
|
#1 |
|
Senior Member

Join Date: Jun 2009
Posts: 108
|
question
I have a question about running a FF and bait tank from the same 12V battery for you innovators... Can I just switch the wiring of the bilge pump without affecting the FF?
Or.... has anybody used the computer fan speed control with success? |

|

|
|
01-27-2010, 12:05 PM
|
#2 | |
|
Olivenhain Bob

Join Date: May 2008
Location: Olivenhain, CA
Posts: 1,121
|
Quote:
You could probably put some sort of a rheostat in line to the pump motor to reduce the voltage but I have never tried that solution. Bob |
|
|
|
|
|
01-29-2010, 06:43 PM
|
#3 |
|
Junior
Join Date: Mar 2008
Posts: 22
|
With the 12 volt battery , the run time will be shorter than with a 6 volt
Here's a stand up bar mounted on the Trax rail Last edited by SteveK; 01-29-2010 at 07:01 PM. |
|
|
|
|
02-19-2010, 06:14 PM
|
#4 |
|
Olivenhain Bob
Join Date: May 2008
Location: Olivenhain, CA
Posts: 1,121
|
Rodholder Mod
About two years ago, I bought a Hobie Revolution and joined the yakfisher community. The Revo is a very well designed kayak but it is not without its flaws. One of the biggest issues I had with my boat from the beginning was the placement of the molded rod holders. They are too far to the stern to be very useful to me. My solution to this problem at the time was to build a “trolling bar” which gave me the ability to place two rods in a more accessible location and at an angle that is more suitable for trolling than the stock setup. You can see this device below.
002.jpg This trolling bar served me well until I picked up a Hobie Livewell a few months ago. While I could use the trolling bar with this bait tank, the supporting cross bar got in the way of the tank lid so it could not be opened all the way. I had wanted to update the trolling bar design for some time so this gave me the incentive to head to the shop and get to work. The goal was to design something that could be inserted into the molded rod holders and create a readily accessible, sturdy rod storage/trolling apparatus. The device would have to be easily installed and removed. The most important design objective was to move the rod holder positioning forward so that the rods could be easily reached without having to twist sideways while seated in the yak. A bonus goal was to make the angle of the rod holder adjustable from straight up for storage to about 60 degrees out for trolling. I think I nailed it! P1020528.jpg Below you will see the various pieces of PVC and ABS components prior to assembly. The total cost of the parts needed to build one of these is less than $10. P1020527.jpg Because my 2008 Revo has the rudder raising and lowering lever mounted on the starboard side next to the seat, I had to make two versions of this device which I call the inboard and outboard versions. The inboard design is well braced against the kayak so it may be a little sturdier. On the other hand this design takes up some space in the bait tank well, so on some narrow kayaks the outboard design may be a better choice. The newer Hobies no longer use a rudder lever so both versions will work on either side of the latest Hobie yaks. The photo below shows both versions installed with the rod holders in the trolling position. Inboard-outboard-trolling.jpg Assembly is easy. Start by cutting a piece of 1.25” PVC pipe just long enough to fit into the molded rod holder. Wrap this pipe with duct tape until the pipe fits snugly into the rod holder, (I use Gorilla Tape because it is very tough). Place a 1.25” to 1.5” slip adapter over the end of the pipe. (DO NOT GLUE ANYTHING YET!) Next fit a 1.5" sink trap assembly over the adapter. There are two versions of sink traps. One you glue together, the other has an integrated tightening collar that holds the two pieces together. Both will work for this project. I used the glue together version because it was cheaper. The next piece to go on is a 60 degree elbow. This will be attached to the sink trap on one end, and to a 1.5” slip/thread adapter on the other with short pieces of 1.5” ABS pipe. The length of these pieces of pipe will be determined by the type of kayak you have and where you want the rod holder to be. The longer these pieces are the further forward the rod holder will end up. After some experimenting, I found that the best place for the rod holder to be, for my usage, is an inch or two behind the back of the kayak seat. This is about a foot forward of the stock rod holder position but still far enough back so it will not interfere with paddling. One of the reasons for not gluing anything right away is that there are many adjustments you can make in terms of length and angles. If you want the rod holder to end up further forward that what I did, just use a longer piece of connecting pipe. If you want to always have your rod holder in the same angle position, you will not need to use the male and female threaded adapters that go on next. Just attach a 90 degree elbow to the 60 degree elbow from the last step. For the adjustable version, mate a male and female threaded adapter to the two elbows. Tighten these adapters so they are almost all the way in but still have enough travel to allow you to tighten or loosen in order to position the rod holder where you want it to be. Finally, cut a 10” to 12” piece of 1.5” ABS pipe and fit it in the 90 degree elbow. I cut the top at an angle to make it easier to insert the rod butt but this is optional. When all the pieces are attached together, insert the PVC pipe into the kayak’s rod holder. Twist and turn the various components until you are happy with the positioning of all the pieces. You want the device to fit easily into the molded rod holder and at some point near the other end, make contact with the kayak. This will be the anchor point where you will eventually strap the device to the kayak. Storage-Position-2.jpg My instructions may sound a little complicated but they will all make perfect sense when you have the pieces in your hands and start putting things together. When you are happy with the way everything fits, put some alignment marks on all the connecting pieces so you can reproduce the angles and connections. Double check everything again and then glue the pieces together. The last steps are done after all the pieces have been glued together. You will need to find a way strap the installed device to your kayak at the point that it touches the deck near the new rod holder end. I first used a Velcro strap that had been threaded through a nylon eyelet that I riveted to the kayak in a suitable place. This works but I am looking for a stronger strap that can be tightened more than the Velcro will allow. One of those ratchet buckles from a ski boot or snowboard binding would be perfect. When I find one, I will give this a try. You can also use a belt, a piece of rope or even a zip tie which would have to be cut off when you want to remove this device. The last step is to set the angles of the rod holder. With the unit installed, twist the rod holder end to a vertical position. Drill a small hole through both pieces of the threaded adapter and insert a pin in the hole to lock the rod holder in this position. Remove the pin; reposition the rod holder at the angle or angles that you would like to use for trolling and drill additional holes, using the first hole as a pilot hole. Make sure the pin fits in these positions and you are done. Although I designed this device to be used on a Revo, this design can easily be adapted to work on just about any kayak with molded rod holders located behind the seat. I have tested this setup on the water and it works great. I have much better access to my bait tank than with the trolling bar and can easily monitor the rod tips while trolling without having to twist and contort myself from side to side. I also gain two handy storage locations for rods or a gaff. After the maiden voyage, I added a couple of eyelets to each of these units to serve as attachment points for gear leashes. The first one of these things that I built took hours of trial and error. The second one took less than ten minutes to build. I think that this thing may be one of the most useful mods I have come up with so far. What do you think? Bob Last edited by dsafety; 02-20-2010 at 06:50 AM. |
|
|
|
|
04-02-2010, 10:26 PM
|
#5 |
|
Junior
Join Date: Feb 2010
Location: national city
Posts: 5
 |
ill have to try some of your ideas
|
|
|
|
|
03-11-2010, 08:57 PM
|
#6 |
|
Senior Member

Join Date: Mar 2010
Location: San Diego
Posts: 2,385
|
I'm loving all these ideas. So far they have saved me a lot of money. I am making my own leashes for rods, paddle, and anything else that needs to be lashed to the Yak.
|
|
|
|
|
03-24-2010, 09:32 AM
|
#7 |
|
Rum Pirate

Join Date: Mar 2010
Location: Wilds of Mira Mesa
Posts: 388
|
Has anyone tried putting grease in the wet mount like they have for the hummingbird 385 kayak setup?
|
|
|
|
|
03-24-2010, 09:39 AM
|
#8 |
|
Senior Member
Join Date: Mar 2010
Location: San Diego
Posts: 2,385
|
not yet, but it makes sense
|
|
|
|
|
03-24-2010, 09:53 AM
|
#9 |
|
Olivenhain Bob
Join Date: May 2008
Location: Olivenhain, CA
Posts: 1,121
|
I have never played with the grease. I would have two concerns. Does the grease transmit as well as water? More importantly, does the grease flow when it gets warm?
I store my kayak upside down so if the well were partially filled with grease and flowed to the lid while in storage there could be some issues when the yak is flipped over if all the grease is stuck to the lid of the well. I suppose you could completely fill the well with grease but why do that if water works? Bob |
|
|
|
|
03-24-2010, 01:17 PM
|
#10 |
|
Member

Join Date: Jan 2010
Location: Northern Virginia
Posts: 50
|
never used grease.....i vote water. i made a version of bob's wet mount and love it. it has worked very well and you never will have to worry about the mess you could have. i have the 2010 570 hummingbird. i have been out on 3 full day trips and love my readings.
water = no bubbles......grease i am not sure about. plus++++++ water is free! |
|
|
|
|
04-23-2010, 09:33 PM
|
#11 |
|
Junior
Join Date: Feb 2010
Location: national city
Posts: 5
|
something
just killing time with my daughter new at this and getting ready for mexico
|
|
|
|
|
05-04-2010, 07:52 PM
|
#12 |
|
Senior Member

Join Date: May 2007
Location: S.D.
Posts: 133
|
bait tank and rod holder
here is the pic t6ures of the bait tank i was working on and test it last saturday, and it work great and the rod holder look good to but havent realy tested the rode holder yet since o got skunk on sat. i thank everyone on this board for the ideas and innovative from this community. tight lines to everyone and be safe out there
|
|
|
|
|
05-15-2010, 04:33 PM
|
#13 |
|
Senior Member
Join Date: Mar 2005
Posts: 116
|
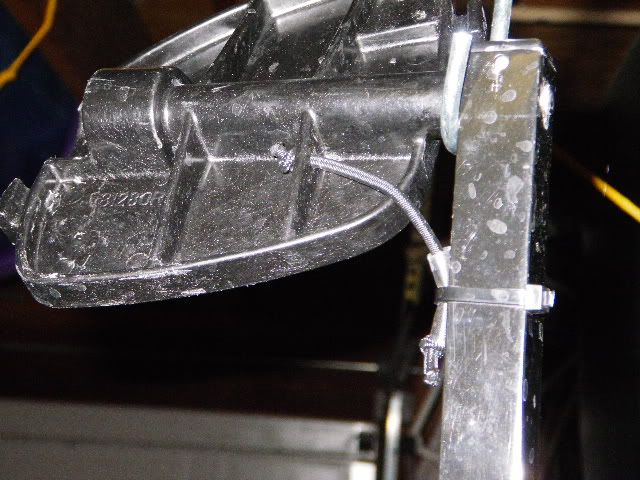
Here's one for the Hobie guys who haven't already remedied the flip flopping peddles. Jared at FastLane showed me how the new Hobie peddles have solved the problem. A small piece of 1/8" shock cord is attached from the top of the crank to the backside of the pedal. This is how I adapted this method. It is much lighter than gooping 2 oz weights to the bottom of the pedals.
 If you want to put standard size lure boxes inside of your kayak, this method will keep them from moving and when you use the bungee, it will secure them in case you flip.  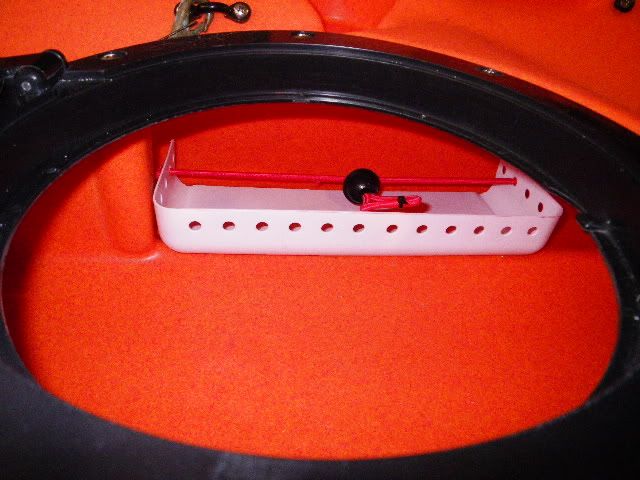 I took a container like this and cut off the bottom, then split it in half. 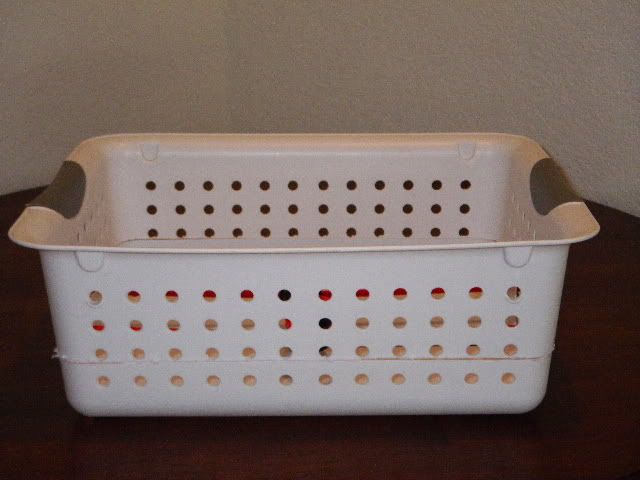 Take a tarp bungee and pull the knot out of the ball. Cut off the knot and then attach each end to a side of the tray holder with an overhand knot. Adding a drainage hole in the corner will keep any water from collecting inside of the holder. Goop it in place and you're done. 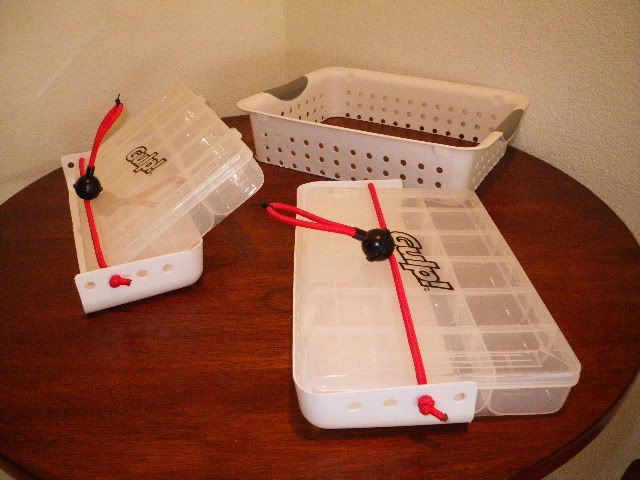 The last idea is more of a tip. Keep a supply of 1/8" stainless steel rod is handy. I have used it to make replacement hooks for rubber straps, dehookers, screen the outflow tube of a bt, bottom for rodholders,  sliding bungee hooks, and loops added to eyelets so additional connections can be made to it.  Industrial Metals Supply carries it in 10 foot (?) length for not too much. |
|
|
|
|
07-06-2010, 07:01 PM
|
#14 |
|
Member

Join Date: Nov 2009
Location: oceanside
Posts: 32
|
not really my innovation but it was pretty cool. was fishing the oside harbor on monday and ran into a guy that turned his rear storage area into a seat for his kid. he put in some eyelets and mounted a seat there. they just sat back to back and the kid fished backwards... i dont have any kids but thought it might be useful to someone..

|
|
|
|
|
09-09-2010, 09:19 PM
|
#15 |
|
Olivenhain Bob
Join Date: May 2008
Location: Olivenhain, CA
Posts: 1,121
|
Utility Belt for your Bait Tank
Fishing has been a little slow so to help keep the juices going, I went to the shop and started tinkering.
One of the biggest issues associated with fishing from a kayak is where to stow the gear. We have hatches in the bow and stern but most of the time these storage areas are hard to get to while on the water. The center hatch is golden but usually crammed full of the most essential gear. Where do you keep the important, but not mission critical gear? Some of the really big kayaks have lots of easily accessible storage areas in the "cockpit". I ride a Revo which, while a great kayak, does not offer much in the way of accessible storage. Somehow we still manage to make do but I know things could be better. I started thinking about ways to augment the stock setup and came up with the idea of a Utility Belt which I would attach to my bait tank. Utility belts are cool. Batman had one. So did Tim the Toolman Taylor, (and Heidi). The idea was to find a way to strap some small items to the bait tank making them easily accessible and not all jumbled up with the other stuff that I store in the center hatch. I started with a piece of shoulder strap webbing from one of the many pieces of luggage or trade show giveaways that I have collected over the years. I chose one with all plastic components. I purchased some snap buckles and assembled the belt attaching one end permanently to the handle of my Hobie tank and clipping the other to a ring attached to the other end of the tank. There are dozens of ways to do this. Another option would be to attach some pad eyes and clip to those. Use your imagination. Once you have figured out a way to attach the belt to the tank, the next step is putting your gear on the belt. For this demonstration I have attached a holster for my needle nose plyers, a fillet knife and an ABS tube that will eventually hold the net for my bait tank. When I get around to making the belt for the other side of the tank, I might attach a water bottle holder, another tube to hold my gaff, first aid kit, bilge pump or one of the other important pieces of gear that we would like to have in an easy accessible location. Here is the basic belt setup. Belt.jpg Here is where the belt attaches to the tank at the handle. Clip.jpg This is the installed belt before I add some of my other gear. Belt-on-tank.jpg This photo shows the belt installed after I have installed my rod holder assembly. (Revo owners, if you have not checked out this rod holder device, you should. It is displayed earlier in this post.) Belt-with-Rod-Holder.jpg This is still a work in progress but I think it may make my days on the water a little better. Bob Last edited by dsafety; 09-10-2010 at 05:51 AM. |
|
|
|
|
09-29-2010, 09:15 AM
|
#16 |
|
Rookie of the Month Club

Join Date: Nov 2008
Location: Mira Mesa
Posts: 483
|
Just my 2 cents, and it actually costs 2 cents. A good way to keep your FF clean and dry the whole time on the water and for those surfy days. The good thing is you can actually use the buttons and read it still with the ziplock on it.
__________________
they are getting bigger.... 
|
|
|
|
|
09-29-2010, 12:56 PM
|
#17 | |
|
Senior Member

Join Date: Aug 2010
Posts: 344
|
Quote:
|
|
|
|
|
|
11-29-2010, 11:23 AM
|
#18 |
|
Senior Member

Join Date: Apr 2010
Posts: 6,855
|
Glowsticks
So I've seen these glow sticks at Home Depot for a few months now and finally decided to buy some and see if I could modify them for hooping.
First reason to buy these is because they come with free battery replacements for life, just pay shipping and handling....I know, I know that's not exactly free but it only cost $15 to replace the batteries on 6 glow sticks. Lifegear also sends you a prepaid envelope to return the old batteries for proper disposal. Not sure how many of you know this but it is illegal to throw batteries in the trash. The last time I bought batteries for my Promar sticks I bought them at Walmart, they sell a similar set of batteries for $5.00+tax, $6 X 6 packs= $36........50% savings by going with the Lifegear brand. Second reason to buy these is because they come with three way lighting. Orange solid, orange flashing, and a flashlight at the tip, this part of the light can be reversed and used as a solid white white on the glow stick. First thing I did was cut off the whistle that sits at the bottom of the glow stick, you can leave it on but it just makes the glow stick that much longer and gets in the way. Once you cutoff the whistle you can attach it to your PFD, hopefully you'll never need it but it's good to have one. Next thing was to Goop three areas of the glow stick, you want to Goop the part that has the flashlight, the on/off button and the area where the two pieces come together. Because Goop is slightly flexible once it dries it still allows you to use the on/off button after the Goop dries. About the only downfall to these is that they have a one hour timer on them, I looked at the circuit board to see if I could bypass the time but I couldn't figure out which part of it was the timer. I figured this out the hard way, three of the glow sticks turned off minutes apart from each other while I was hopping. The way to avoid this is to simply turn them off and on each time you pull your net(s). However, because they do have a timer you'll never have to worry about them turning on after you put them away, this happens to my Promar sticks a lot, the copper contact touches the battery and.......you know the rest. Promar makes a god product but if you can get something for less and make it work by making slight modifications why not? You can get three of these for just under $8, that's under $3 each compared to a price of $6 for each for the Promars. Last edited by jorluivil; 11-30-2010 at 03:52 AM. |
|
|
|
|
12-05-2010, 01:06 PM
|
#19 |
|
Team Keine Zugehörigkeit

Join Date: Nov 2010
Location: Way out there
Posts: 2,854
|
while I was out fishing on black Friday I locked my cart up to the lifeguard tower and at the end of the day when I got out some asshole came along and busted off one wheel.So i went to HF and got new wheels. Here's what I did.
old wheel removed from cartold wheel1.jpg old axle removed from old wheelold axel.jpg old axle in new wheel new wheel + axel.jpg fits perfectcompelete new wheel.jpg repeat for the other side all done.jpg While at Hf I picked up a box of snap clips 12 pcs for $5 http://www.harborfreight.com/12-piec...set-67563.html used the snap clips to leash everything down and the box became a tackle box box1.jpg fits perfect in the side pocketbox in yak.jpg I also drilled a hole in a rib inside the hatch and tied the hatch to the inside of the yak added a loop and a snap clip to keep my dry bag close inside.hatch.jpg very productive day for me.
__________________
 Não alimente os trolls------------Don't feed the trolls---------------インタネット荒らしを無視しろ 
|
|
|
|
|
02-25-2011, 01:12 PM
|
#20 |
|
Olivenhain Bob
Join Date: May 2008
Location: Olivenhain, CA
Posts: 1,121
|
Hobie Cup Holder Fix
OK class, raise your hands if this has ever happened to you. After a long day of peddling your yak back and forth in a fruitless search, you decide to call it a day and treat yourself to an ice cold beer in celebration of some beautiful time on the water. You pop the cap and set the bottle in the little hull indentation that Hobie calls a cup holder. It's time to head in but always hopeful, you pin one last greenie on and point your bow toward the launch.
All of a sudden it happens. You hook up. Fish on! The kayak rocks back and forth as your fish puts up an epic fight. Eventually, you win the battle. You land the fish, strap it down and smile. It has been a satisfying day. Time to get back to that beer. You look toward the empty cup holder and then, sadly, spot your empty bottle rolling around the bottom of the kayak. Bummer. I see hands in the air from just about every Hobie driver. Oh look, there are even a few of the paddle guys with their hands up. Well, I have good news. It does not have to be this way. For about $1.50 and a couple minutes work, you can turn that useless dent in your hull into a functional cup holder. All you need is a 3" PVC pipe connector and a piece of Velcro. Clean the pipe connector and the place on your yak where you want to attach the Velcro with some alcohol . Mate the pieces of Velcro together and attach one side to the pipe connector. Peel the tape off the other side of the Velcro and carefully press it in place at the desired location and you are done. Cup-holder-close.gif Cup-holder-with-beer.gif Sometimes the best ideas are really simple ones. Bob |
|
|
|
|
| Tags |
| kayak fishing inovations, kayak rigging ideas |
|
|


 Hybrid Mode
